![[The Talking Machine Forum - For All Antique Phonographs & Recordings]](/styles/we_universal/theme/images/the_talking_machine_forum.png)

So I bought a Victrola XIV several years ago and made a post on the topic.
http://forum.talkingmachine.info/viewto ... =2&t=19143
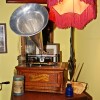
The thing was severely alligatored and rough looking. I thought I would share the (almost) final results with the forum here and hopefully gain some feedback. All of the metal parts were polished to shine with Flitz, the turntable felt was replaced, the crank was scrubbed clean of rust, and the reproducer was expertly rebuilt by Ron Sitko. The most important change, however, is the finish. It is amazing what a little bit of gunk removal, 800 grit sandpaper, and some re-amalgamating can do in the end. I should note that no new finish was added to the machine, only the old one was smoothed. All I have left to do is figure out how to get this the crank escutcheon secured since the screw holes are worn and allows the screws to be loose. Perhaps a little bit of wood putty or a small bit of epoxy might do the trick.
(Clicking on the photos should correct their orientation.)
-Stephen
The XIV before and after
-
oldphonographsteve

- Victor II
- Posts: 372
- Joined: Mon Dec 03, 2012 5:45 pm
- Personal Text: I'm the guy that found the fault in asphalt
- Location: Connecticut
- Contact:
The XIV before and after
- Attachments
-
- 00X0X_2A9dm2PHndi_600x450.jpg (25.86 KiB) Viewed 1538 times
-
-
-
-
-
-
-
-
-
alang

- VTLA
- Posts: 3115
- Joined: Thu Aug 19, 2010 9:36 am
- Personal Text: TMF Moderator
- Location: Delaware
Re: The XIV before and after
Great Job! For the screw holes, I would fill them with toothpicks and glue, not wood putty. Some use matchsticks, but they are too soft I think.
Andreas
Andreas
-
phonogfp

- Victor Monarch Special
- Posts: 7404
- Joined: Wed Jan 07, 2009 5:08 pm
- Personal Text: "If you look for the bad in people expecting to find it, you surely will." - A. Lincoln
- Location: New York's Finger Lakes
Re: The XIV before and after
Wow, Steve - that doesn't look like the same machine! Well done.
As for the crank escutcheon, the fix is easy. Simply grab a wooden toothpick and some wood glue. Break off the toothpick in the hole (2 or 3 times), then pull out the pieces, cover them with wood glue, and reinsert them into the hole. Some folks like to let it dry completely before re-installing the screws, but I prefer to let it set up for about 30 minutes, then reinstall while the wood/glue is still a bit flexible (and don't torque those screws of course). Either way works.
Congratulations on a nice job - -
George P.
-
phonogfp
- Victor Monarch Special
- Posts: 7404
- Joined: Wed Jan 07, 2009 5:08 pm
- Personal Text: "If you look for the bad in people expecting to find it, you surely will." - A. Lincoln
- Location: New York's Finger Lakes
Re: The XIV before and after
Andreas and I were typing simultaneously! 
George P.
George P.
-
oldphonographsteve
- Victor II
- Posts: 372
- Joined: Mon Dec 03, 2012 5:45 pm
- Personal Text: I'm the guy that found the fault in asphalt
- Location: Connecticut
- Contact:
Re: The XIV before and after
alang wrote:Great Job! For the screw holes, I would fill them with toothpicks and glue, not wood putty. Some use matchsticks, but they are too soft I think.
Andreas
Thanks for letting me know! I will try it as soon as I get my hands on some toothpicks and wood glue. I'd head off to Home Depot, but the roads are a bit dicey at the moment.phonogfp wrote:Wow, Steve - that doesn't look like the same machine! Well done.
As for the crank escutcheon, the fix is easy. Simply grab a wooden toothpick and some wood glue. Break off the toothpick in the hole (2 or 3 times), then pull out the pieces, cover them with wood glue, and reinsert them into the hole. Some folks like to let it dry completely before re-installing the screws, but I prefer to let it set up for about 30 minutes, then reinstall while the wood/glue is still a bit flexible (and don't torque those screws of course). Either way works.
Congratulations on a nice job - -
George P.
-Stephen
-
fran604g
- Victor VI
- Posts: 3988
- Joined: Mon Mar 04, 2013 2:22 pm
- Personal Text: I'm Feeling Cranky
- Location: Hemlock, NY
Re: The XIV before and after
A beautiful job, Steve! Congratulations on a job well-done.
Happy Holidays!
Fran
Happy Holidays!
Fran
Francis; "i" for him, "e" for her
"Even a blind squirrel finds a nut once in a while" - the unappreciative supervisor.
"Even a blind squirrel finds a nut once in a while" - the unappreciative supervisor.
-
Django

- Victor IV
- Posts: 1693
- Joined: Thu Apr 13, 2017 7:31 pm
- Location: New Hampshire’s West Coast
Re: The XIV before and after
An alternative repair for stripped holes is to open them up to 3/16” and glue in some dowels. I did this recently, but instead of using ready made dowels, I turned and pre-drilled the plugs from some old mahogany. I glued them in with Titebond 3 wood glue. It is a little more work, but a nice permanent fix.
Your machine looks great.
Your machine looks great.
-
EdiBrunsVic
- Victor IV
- Posts: 1065
- Joined: Mon Jun 28, 2010 12:12 pm
- Location: Cranberry Township, PA
Re: The XIV before and after
Yes, it looks just great.
-
Cody K

- Victor III
- Posts: 754
- Joined: Mon Sep 23, 2013 8:03 pm
- Location: Connecticut, USA
Re: The XIV before and after
Steve, that's a beautiful job. It's amazing how good an abused finish can look after careful treatment with superfine sandpaper and a good cleaning and polishing -- and lots of patience. It's very satisfying to see a long-neglected machine come back to life. Well done!
"Gosh darn a Billiken anyhow."- Uncle Josh Weathersby
-
Phono-Phan

- Victor V
- Posts: 2479
- Joined: Fri Apr 06, 2012 9:38 pm
- Location: Plover, WI
Re: The XIV before and after
Awesome job on this restoration!!! The toothpick remedy works great. I have used it for years.
Ken Brekke
Ken Brekke