![[The Talking Machine Forum - For All Antique Phonographs & Recordings]](/styles/we_universal/theme/images/the_talking_machine_forum.png)

DIARY OF A BOY'S PHONOGRAPH
- Restoring Edison Standard Phonograph, Model E # 803218 -
I have an old schoolmate that I see from time to time. He has two sons that my two daughters enjoy playing with. The eldest boy seems drawn to my collection of phonographs. He seems fascinated by their details and engineering. He peppers me with questions about them and seems to hang on to the stories I tell him. He reminds me of myself at that age. This kid needs a hobby!
At some point I resolved to restore a completely beat machine for him. That's how I came to acquire the very beat Edison Standard Model E, serial number 803218. I saw it on eBay and I felt that it would be a good basis for a restoration. The project would yield a phonograph for an interested kid and a give me a trial run on some techniques I wanted to try. (I already have my own Model E that needs some cosmetic help.)
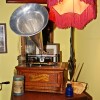
Number 803218 arrived in early November and I snapped a few "before" photos. The cabinet had been refinished using semi-gloss polyurethane. It was an almost OK refinish except for the color and the finish had that somewhat thick, plastic-like look. The stain they used was a pigmented stain of some kind, so the grain was somewhat obscured. My main objection was that the color was way too light compared to the other original machines in my collection. While I was unpacking the machine, I ran into a problem that I didn't anticipate: the lid had been glued and clamped in such a way that one side had a pretty nasty warp in it. I had little hope of straightening it out. I sighed a little as I added a lid to the parts shopping list.
The bedplate was rusty with no hope for salvaging the original paint. The reproducer and its carriage were missing as well as the feedscrew. As usual with these later machines, the pot-metal mandrel bearing was frozen with internal corrosion. The mandrel was loose on the shaft probably because somebody was trying to rotate it by hand to extract the shaft from the now too-tight pot metal bearing. A lid clip, lid handle and crank were also missing. Luckily, I had an extra lid handle from a previous restoration.
- Gareth_Std_E_Case_before.jpg (90.21 KiB) Viewed 1066 times
- GF_StdE_Before_topworks.jpg (94.58 KiB) Viewed 1066 times
- GR_StdE_Before_Gear_Belt_detail.jpg (75.06 KiB) Viewed 1066 times
- GR_StdE_Before_lid_chips.jpg (85.87 KiB) Viewed 1066 times
- GR_StdE_Before_Overhead.jpg (107.56 KiB) Viewed 1066 times
- GR_StdE_detail_lid_warp.jpg (88.41 KiB) Viewed 1066 times
- GR_StdE_Before_Loose_Mandrel.jpg (72.89 KiB) Viewed 1066 times
I disassembled & cleaned the top works and motor. I discovered that the first shaft on the motor gear cluster was bent and therefore binding on every revolution. There was also a pretty badly chewed brass pinion gear on the third shaft. For the icing on this greasy cake, I discovered that the mainspring was broken about 6" in from the center coils. The parts list grew longer. (It later turned out that Dwayne Wyatt was able to straighten the bent shaft for me.) All of the cleaned small parts were stored in zip-lock bags according to their location. Finally I had a bedplate that was free of parts and ready for re-finishing.
- GR_StdE_Bedplate_Before_Stripping.jpg (93.24 KiB) Viewed 1066 times
One of the things that I wanted to try was to duplicate the type of bedplate paint that was used. I had been following discussions on-line about suitable types of paint. The discussion briefly touched on the fact that the original type was "Asphaltum" (sometimes called "Black Japan"). I found that somebody still made it for use in boat restorations. It's called "Pontypool - Black Japanning Asphaltum Paint". It is available through libertyonthehudson.com
- Black_Japan.jpg (70.2 KiB) Viewed 1066 times
- GR_StdE_Stripped_Bedplate.jpg (89.88 KiB) Viewed 1066 times
- GR_StdE_Bedplate_Serial_detail.jpg (83.18 KiB) Viewed 1066 times
The Pontypool is very thick and, well, tar-like. I thinned it a bit with mineral spirits until it was like very thick cream. I brushed it on with 1" disposable bristle brushes. The brush marks flowed-out to some degree as it dried, but it was obvious that it would need to be sanded and polished at some point. It took a long time to cure, and behaved a little differently than most paint I am used to. I finally resorted to baking the enameled pieces in my oven at about 120 degrees F for about 3 - 4 hours. (Very smelly!) That hardened things up enough to sand between coats. It also helped "flow out" the brush strokes a bit more. I ended up doing about 4 coats. (With smoother application, or spraying, I imagine three coats might be enough.) I wet sanded the final coat and rubbed out the surface with auto body polishing compound. Once it was nice and smooth, it was ready for the decals.
- GR_StdE_Bedplate_Bake.jpg (105.17 KiB) Viewed 1066 times
It was at this point in the process that I had The Bad Day. Ever had one of those where you can't just leave something alone and you dig yourself in deeper and deeper? One day I decided to use a screw to clean out the threads in the bedplate while the paint was curing. (Little bits of paint had crept into the screw-holes.) Well, I can tell you don't do this with one of the more fragile wide-headed screws. And REALLY don't keep turning it when it offers resistance. I broke the head off the screw. Now, it should never have come to that. But did I stop? I did not. In my madness, I reached for my hand-held drill. I didn't use a left handed bit as I should have, just a regular bit. Of course, the bit wobbled.
The insanity began to lift and I put everything down and ordered a left hand drill set and a replacement wide-head screw. Three days later, I was able to extract what was left of the screw. I got lucky in that the threads were still more or less intact enough to accept another screw. All of that for just fooling around and not walking away. Ah well; that's why Beer was invented.
- Cline_Decals.jpg (90.35 KiB) Viewed 1066 times
Gregg Cline sent me a set of decals. His artwork is pretty accurate (unlike many others') and he is nice to deal with. Once the decals were trimmed and applied, came several over-coats of Orange Shellac. There was some strange crinkling of the finish in spots on coat # 2. Perhaps it was too soon for a re-coat or that the brush had too much thinner. It seemed to go away OK with drying, sanding and recoating. (Note for future projects: Don't be tempted to stick this in the oven, or even in the sunlight, as you will get bubbles. Room temperature is plenty warm!) After letting the Shellac top-coat dry for about a week, I wet sanded and then polished to a medium gloss. I finished it all off with a coat of auto body wax for a little more protection.
- GR_StdE_Bedplate_Decal_appl.jpg (84.17 KiB) Viewed 1066 times
- GR_StdE_Bedplate_Corner_Detail.jpg (59.04 KiB) Viewed 1066 times
While I was re-finishing the bedplate, I also was working on the cabinet. I really hate tossing original stuff, so I renewed my efforts at salvaging the original warped lid. I removed the moulding that had been re-glued on in a previous re-do. It appeared that the clamping was not supported properly and was probably the reason behind the warp. The moulding wanted to come off in pieces, but I was able to get it off mostly intact with some cracking and one very small hole. I stripped off the finish and soaked the warped half of the lid in warm water for about 8 hours. I then clamped the lid to my bench with it shimmed up in the middle giving it a reverse bend. I checked it periodically for the next couple of days, loosening the clamps as needed. (This was all done by the "that looks about right" method.) I used the same process on the bent lid moulding. I was amazed by how much it improved.
- GR_StdE_Corrected_Lid.jpg (88.14 KiB) Viewed 1066 times
- GR_StdE_Stripped_Case_Lid.jpg (84.53 KiB) Viewed 1066 times
After all was dry, various bits of veneer and parts of joints had to be re-glued. I also had to re-attach the straightened moulding. I used polyurethane glue for this as it has the ability to span gaps. I decided to fill in missing veneer chips with filler, rather than try to patch-in as I had in the past. In the past, I always ended up being able to see the repair. This time, I decided to fake the grain and color in an effort to make the repairs more invisible. I used a single-bladed razor to make grain voids. For the wood stain, I finally decided to use "Van Dyke Brown" from Mohawk. They still make aniline dye type stains. This kind of stain is trickier to use, but doesn't obscure the grain as the modern types do. (Note to self: Dilute stain to half of what appears to be the right intensity. The black grain filler will darken-up the finish in the next step.) I prepared the stain as a water stain so it wouldn't "move" quite so much when the shellac goes on.
- GF_StdE_Stripped_Case1.jpg (83.23 KiB) Viewed 1066 times
After the stain dried, I sanded the cabinet lightly, and applied a very thin coat of white shellac. (Next time, I will do two very thin coats). After that dried, the black grain-filler was applied, scraped-down, dried and sanded. (I always lose too much filler at this point. This occasion was no exception.) Then I did about 6 thin coats of white shellac wiped-on with paper towel pads to fill up the grain. All during that procedure, I kept touching up the color of the filled-in patches with a small brush and the occasional sharpie marker. After that came about 3 thicker coats of Orange Shellac applied with a 1" fine sable brush. I also followed this procedure for the main cabinet itself.
- GR_StdE_Case_Decal_appl.jpg (113.36 KiB) Viewed 1066 times
After it was dry enough, I sanded and polished the cabinet and applied the "Edison" cabinet decal to the front, which was followed by 4 more coats of Shellac. Er, make that 5 coats of shellac. I left the cabinet too close to the oven and the shellac bubbled on the front. I can hear the old Kung Fu master saying: "Patience, Grasshopper!" With the bedplate finished, it was time to put back the various parts. (Some required wire-brushing and polishing to look acceptable.) I thought the ID plate looked good enough to leave as-is. (Some of the only remaining original finish on the entire machine!)
- GF_StdE_Finished_Bedplate.jpg (90.45 KiB) Viewed 1066 times
I was entering the home stretch and I had just a few major things to do. It was time to replace the mainspring. (Sometimes I like to save the fun things for last.) I felt that the original spring was broken too far in to yield very good power, so I opted for replacement. On a whim, I ordered the spring from a different supplier. It turned out to be a much cruder affair that what I was used to. The spring edges were not trimmed as well as the ones I am used to. It had sharp edges and some slightly ragged steel splinters. (Ouch.) The entire surface had a very light coating of oxidation. For this to function well, I sanded the rough edges and polished off the oxide with steel wool. The one thing I have to say about the spring that is positive is that it was a slightly thicker gauge and seems to give more torque than the old one.
After sanding and prepping the spring, I did the same to the inside of the empty spring barrel, so the coils would slide more easily. The machine had been in a damp environment at some point and the inside of the barrel had a slight coating of rust. When all was clean and ready, it was time to install the spring. I began by coating the inside of the barrel with black moly grease cut with a little oil. It took quite some time and quite a bit of force to hook the new spring into the barrel. I slowly fed the spring in, turn by turn, keeping control, greasing the spring with more grease as it went in. This really required the use of gloves, (and I have the beat-up hands to prove it). Apart from the springs on my Diamond Disc machine, this spring was the hardest to replace of all the machines I have tackled so far. I actually had to lean on it part way through to anchor it while I rested my arms. (Either I'm getting old, or that spring was a bear!)
Once the spring barrel had its new spring installed, it was time to assemble everything and start adjusting it to play properly. Here was where I hit another snag. (That's the fun of restoration; hitting snags and fixing them.) When all was together, I turned the crank onto its threaded shaft, when *clunk* the crank snugged-up against the wooden bedplate frame. It couldn't be wound. That wasn't right. Upon inspection, the winding shaft seemed to be too short for the crank. The crank fit perfectly on my other Standards. The winding shaft on the other machines was 3 ⅞" but was only 3 ½" on this machine.
- GR_StdE_winding_shaft.jpg (73.6 KiB) Viewed 1066 times
Could it have been an end-of-run factory economy using parts from a different machine and a longer crank? Or was it simply someone trying to swap-out a part that wasn't actually swappable? (Probably the latter.) The simplest solution seemed to be replacing the winding shaft. A quick note to George Vollema (phonographic angel and all-around nice guy), and the replacement shaft was in the mail.
After replacing the shaft, it was time for a belt. No, not that kind of a belt: a leather belt to drive the mandrel shaft. This was Pet Peeve Territory. I hate replacing belts. They always seem to require many trials. They have to be trimmed to fit. Most of the belt material I find is either is too thick and the wrong color or if it is the right thickness and color, it won't lie flat on the pulleys. In this instance, I ended up using the ugly thicker stuff. I have more of it and it will at least lie flat.(Note from 2018: Thankfully, better stuff is now generally available.)
With the belt replaced, it was time to crank-up and get the upper works moving. The heavy-duty spring took a little more effort to crank-up, but boy, it sure had plenty of power! I'm used to my other Standards having just enough torque when things were adjusted correctly, but this was really going strong. I stuck my Model N reproducer in the carrier and slipped "I'm The Guy" on the mandrel. Billy Murray sounded like an underwater castrato that needed to use the restroom. What fun would it be if it worked right the first time? After adjusting the speed the playback was still uneven. Out came the governor for a more thorough cleaning. I had cheated and cleaned it as a unit, rather than removing it from its shaft. (tsk, tsk) After re-installing, I tried again. Now it became obvious that the belt was slipping. (Did I mention that I hate replacing belts?) I had installed it a little loose and it had stretched a bit. In this case, the second time turned out to be the right fit. Billy Murray sounded pretty good that time. There was a very slight bit of warble, which could be from using a Witch's Hat horn, or some other very, very slight drag somewhere. Still, it sounded pretty good, I think.