![[The Talking Machine Forum - For All Antique Phonographs & Recordings]](/styles/we_universal/theme/images/the_talking_machine_forum.png)


Enjoy.
— MordEth
Best Finishes for Wood:
The Smart Ways to Use Shellac
by Jackson HandOf the three most common on-the-surface finishes for wood—varnish, shellac, and lacquer—shellac is by far the easiest for most people to use. The reason lies in the way you apply shellac as much as in its special characteristics.
Shellac is never a one-coat finish. You build a finish with it in two or more coats. With each coat you have a chance to repair the mistakes you made and to smooth out blemishes caused by dust. True, you can do this with varnish, but varnish dries so slowly that a three-coat job takes three days. You can do it with lacquer, too, but lacquer dries so fast that many now-and-then finishers find it hard to apply smoothly. Shellac, meanwhile, dries dustfree in a half-hour or less. You can recoat it in three or four hours. Properly thinned, it flows on easily and hardly ever shows lap marks, since the brush-over tends to soften the preceding brush stroke, blending the two.
Few finishes have such great natural adhesion, and since successive coats tend to fuse together, most people end up with a smooth, level surface. Shellac is flexible and does not check or craze when properly applied in several thin coats.
It presents you with a choice of surfaces: It builds to a good sheen, rubs to a good satin, steel-wools to a flat finish, takes waxing very well. Waxing is essential if you want the finish to be water resistant.
To many an eye, nothing beats shellac for the color it gives wood—warm and woodsy in a depth about halfway between the cool color of lacquer and the dark warmth of penetrating resin sealers. The tone shellac gives dark woods is one of the reasons why many good finishers brush on a coat of shellac, even though they may plan to gain the greater durability of varnish with subsequent coats. (Never use a urethane varnish over shellac, however; adhesion is poor.)
Made by harvesting a natural resin secreted by an insect and dissolving it in denatured alcohol, shellac is about as economical a product for wood finishing as can be made. In today’s age of sophisticated paint chemistry, it is one of the last remaining unsynthesized materials for wood finishing.
How to buy shellac. First, never buy more than you need. Shellac is not stable beyond six months or so from the time that it is made. When out of date, it may not dry. In practice, you can test leftovers. If they dry—okay. If they don’t—fling ’em out. Some companies date the cans. Others let you guess how long the dealer may have had the can on his shelves.
Second, don’t save money on anything as shellac. Name brands help you be sure the shellac is fresh, up to standard, and packaged in lined containers (glass is best) to avoid the discoloration that may result from chemical reactions between the alcohol and ferrous metals.
Third, buy at least as much denatured alcohol as you do shellac, because you never use shellac as it comes. Think of it, instead, as a sort of stock solution that you mix with additional alcohol when you use it.
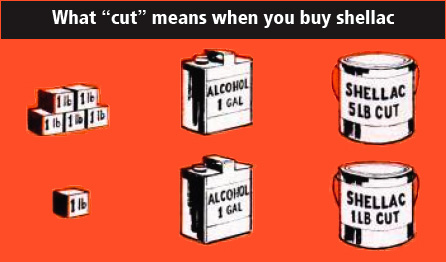
What “cut” should you get? Shellac is designated as “4-lb. cut,” “3-lb. cut,” etc. These indicated the proportion of resin to alcohol—the number of pounds of resin per gallon of alcohol. The three-pound is ready to use on floors, but it, like other concentrations, must be thinned for fine work. Which you buy makes no difference, since you’ll thin it further, anyway.
By far more white shellac is used than orange, although the amber cast of the orange is preferred often for walnut, mahogany, and other dark woods. Actually, the difference in color on wood is small.
How to use shellac. Within reason, the thinner you use shellac, the better. At about one-pound, shellac brushes on fast and tolerates a great deal of ineptness. With so much alcohol in it, it dries quickly for recoating. Moreover, it penetrates and adheres better. At thicker cuts, adhesion and penetration are not so good, the film doesn’t dry as hard—and drying is slow.
After the first coat dries, hit it light—but thoroughly—with 6/0 sandpaper and give it another coat. As soon as the second coat is hard—it’ll take longer than the first coat—sand again and coat again. With three coats, you’ll have a decent film.
Many operators put three coats on non-wearing surfaces, such as the sides of a chest, then put one or two extra on the top. This is good practice, as long as the film is entire on the sides and other non-critical areas, so color uniformity is good.
This is the most foolproof way to use shellac. As your skills improve, you can work with two- or three-pound cuts and use fewer coats.
Put it on wet. Shellac forms the smoothest coat when you dip a full brush and flow the material on wet. Brush slowly, so you don’t create bubbles. Lap each brush stroke over the last one. Work for uniformity of coverage, although the multi-coat system recommended usually results in good evenness without more than normal attention to smooth brushing.
Sand between coats. The first coat of shellac, over the best-sanded wood, produces a “tooth” much like raised grain. Sand it off, smooth. Shellac always clogs the paper quickly, since it gums up under the friction of sanding. Either use cheap flint paper and lots of it—or an open-coat paper that will absorb more shellac before it becomes useless.
The second coat may show some of the same tooth—and perhaps the little sharp pinnacles caused by dust. Again, sand. When the desired film thickness is there, hit the surface once more with 6/0, then switch to steel wool. A 4/0 grade will give you a a good satin finish, which is excellent bare, or waxed for greater protection. Allow at least 24 hours before waxing shellac. Finer steel wool, or rubbing pumice, will bring the finish to a smooth sheen.
Less critical work—such as paneling, trim, etc.—can be handled with two coats of shellac at about three-pound cut, and sanding between coats is optional. The natural gloss is usually acceptable for such applications, about halfway between the high gloss of spar varnish and the satin sheen of a semi-gloss varnish.
Anyone should be delighted by over the fact that shellac brushes rinse clean in a mild solution of household ammonia and water. Rollers, too.
French polishing. One of the loveliest finishes for fine furniture, called French polish, is done with shellac and a clean, lintless rag. The surface must be carefully sanded and stained with a water stain or a material that won’t raise the grain.
Pour some shellac at about one-pound cut into a saucer or pan. Dip the rag in the shellac and apply it with smooth, quick, even strokes, grainwise. When this application is dry, hit the surface lightly with 6/0 paper and repeat the wipe-on process. Continue until the film is thick enough to show a slight sheen.
At this point, put several drops of boiled linseed oil in the shellac mixture, and change the application technique from one of wiping on to one of polishing in a circular movement. As more and more coats go on, add more drops of oil.
When you get to a degree of build that satisfies, stop. This finish takes time, but owing to the polish-on technique it is extremely lustrous—worth all the work.
How to thin shellac for use
| If you start with this basic cut: | Add this much alcohol per quart: | To produce this cut: |
|---|---|---|
| 5 lb. | ⅜ pint | 3 lb. |
| 5 lb. | 1 quart | 2 lb. |
| 5 lb. | ⅔ gallon | 1 lb. |
| 4 lb. | ½ pint | 3 lb. |
| 4 lb. | ¾ quart | 2 lb. |
| 4 lb. | 2 quarts | 1 lb. |
| 3 lb. | ½ pint | 2 lb. |
| 3 lb. | 3 pints | 1 lb. |