RESTORATION DIARY: EDISON STANDARD MODEL A #132017

Discussions on Talking Machines & Accessories
martinola
Victor III
Posts: 953
Joined: Wed Feb 11, 2009 1:30 pm

RESTORATION DIARY: EDISON STANDARD MODEL A #132017

Post by martinola »

My first Standard was a Green Oak Standard Model A that my cousin decided I needed to buy from him. From that grew a strange obsession with the Edison Standard in general. As time went on, I acquired other Standards, some in better condition than others. In restoring the cases, I got fairly good at replicating the Antique Oak finish, but I never got a chance to do a Green Oak finish. For some reason this has bugged me over the years.

In order to be a complete Smarty Pants when it comes to refinishing Standards, I decided that I needed to do a Green Oak Standard. One additional problem is that over the years I've developed an ethos to never refinish when the original can be salvaged. That meant that I was looking for a machine that was either already refinished or one that was really beat. When Ken Brekke (Phono-Phan) listed one for parts or restoration in the Yankee Trader section some months ago, I finally had a candidate for the project.

The machine seemed to be a barn find. The finish was mostly flaked off, the Banner transfer was largely gone. This was a mid-production version of the New style Model A. It had a button lift, the lid moulding had a smoothed top edge. The baseboard had warping and splitting as is often found these machines. It needed re-gluing and a complete cosmetic makeover.

The motor was missing a few key components. It appeared that someone may have begun parting it out or it may have simply been a case of an arrested restoration.

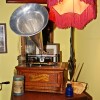
Here are a few "before" photos of the Case:
031_Front_w_lid.jpg
031_Front_w_lid.jpg (401.17 KiB) Viewed 3520 times
Excessive finish loss, makes this an ideal candidate for a total refinish.
032_Banner_CU.jpg
032_Banner_CU.jpg (459.24 KiB) Viewed 3520 times
Alas, the remnants of the original Banner decal only hint at its former graphic beauty.
040_lid_splits.jpg
040_lid_splits.jpg (380.83 KiB) Viewed 3520 times
The lid has splits from dampness and drying cycles.
046_base_splits.jpg
046_base_splits.jpg (420.5 KiB) Viewed 3520 times
The baseboard is made from three glued boards. The front board has completely split away and the other two boards are thinking about it.
078_wasp_nest.jpg
078_wasp_nest.jpg (333.97 KiB) Viewed 3520 times
It looks like there was a wasp's nest inside the case on the right rear corner.
072_Orig_Color.jpg
072_Orig_Color.jpg (272.39 KiB) Viewed 3520 times
Here's a hint of what the original color may have looked like.
060_Ins_3.jpg
060_Ins_3.jpg (418.35 KiB) Viewed 3520 times
Looks like the lid was passed by inspector #3.


Here are some "before" pictures of the bedplate and motor:
057_motor_B4.jpg
057_motor_B4.jpg (298.94 KiB) Viewed 3520 times
Typical open-spoked spring barrel. Some rust. Missing the Speed control arm, governor, yoke and "on/off" lever.
053_top_view_B4.jpg
053_top_view_B4.jpg (392.27 KiB) Viewed 3520 times
The bedplate's shellac coating looks kind of beat. The gold decorations are about 70 percent there. The patent plate still has a bit of the original silver highlights. Thank goodness the mandrel still looks good.


Now to begin!

I let the case sit in the breakfast room for about 3 weeks. It was winter and I wanted the internal moisture of the wood to stabilize before I tried gluing everything back together. I'm not entirely sure it made much of a difference, but it also gave me some time to review different methods of staining, finishing, grain-filling and the like.

When the "go" day came, I started by disassembling everything, and labeling. Ideally, I wanted every screw to go back into its original position.
093_screw_ID.jpg
093_screw_ID.jpg (385.98 KiB) Viewed 3520 times
I had a bunch of this stuff in ziplock bags.

martinola
Victor III
Posts: 953
Joined: Wed Feb 11, 2009 1:30 pm

Re: RESTORATION DIARY: EDISON STANDARD MODEL A #132017

Post by martinola »

I began by re-gluing all of the dried-out joints. In order to have extra assembly time, I used liquid hide glue. Besides being historically appropriate, it's also easily reversible. (Just don't leave the machine out in the rain.)
089_base_pre_glue.jpg
089_base_pre_glue.jpg (424.19 KiB) Viewed 3516 times
Preparing to glue up the baseboard. Wax paper helps keep things from sticking to the work bench.
090_base_clamp.jpg
090_base_clamp.jpg (404.72 KiB) Viewed 3516 times
Clamping it up.

Re-gluing the split baseboard was a bit tricky in that the boards had warped somewhat from exposure to moisture. The messy glued areas were caused by using my fingers to "feel" the smoothness of the join.
105_base_clean_up.jpg
105_base_clean_up.jpg (408.42 KiB) Viewed 3516 times
The glued baseboard getting cleaned up with my favorite tool.


Three of the four finger-jointed corners on the box were dry and loose. A few knocks with a mallet got them apart for scraping the junk out of the joints.
087_clean_fingerjoints.jpg
087_clean_fingerjoints.jpg (401.35 KiB) Viewed 3516 times
104_reassb_case.jpg
104_reassb_case.jpg (390.85 KiB) Viewed 3516 times
I didn't want to drill new holes, so I aligned everything using the original screws as position guides.
113_glue_up.jpg
113_glue_up.jpg (355.52 KiB) Viewed 3516 times
Starting the glue-up. Wax paper protects the cleaned-up baseboard used for hole alignment.
118_case_clamp.jpg
118_case_clamp.jpg (385.43 KiB) Viewed 3516 times
Clamping the case.
137_case_unclamped.jpg
137_case_unclamped.jpg (414.69 KiB) Viewed 3516 times
Case unclamped.

The veneer splits and lifts in the lid required a little scraping-out and re-gluing.
140_lid_glue.jpg
140_lid_glue.jpg (410.07 KiB) Viewed 3516 times
During this process, I noticed how the box was attached to the baseboard about 1/16" too far left. (See first photo.) I finally decided not to "improve" the factory error by re-drilling the holes.


After all of the wood was back together, it was time to take off the old finish. In this case a lot of the work had already been done; it had simply fallen off. I wanted to start off fresh. I didn't want to run the risk of having the old finish sink into the wood and mess up the staining process. Therefore I elected to sand-off the old finish rather than melt it off with alcohol or use a caustic stripper.
143_sanded_case.jpg
143_sanded_case.jpg (366.55 KiB) Viewed 3516 times
Naked again.

martinola
Victor III
Posts: 953
Joined: Wed Feb 11, 2009 1:30 pm

Re: RESTORATION DIARY: EDISON STANDARD MODEL A #132017

Post by martinola »

In between times, I had contacted George Vollema for some of the missing motor pieces. In a week or so, I had in hand everything I needed to make to old motor function. I disassembled everything and gave the parts a scrub-down in lacquer thinner. The spring seemed good and was cleaned with some 0000 steel wool and lacquer thinner. The inside of the barrel seemed on the rough side so I sanded and smoothed it a little bit to aid things being able to slide around better.
084_Spring_barrel.jpg
084_Spring_barrel.jpg (339.04 KiB) Viewed 3515 times
From the looks of many of the screws, they had been attacked by ill-fitting screwdrivers. I spent an evening filing, reshaping and bluing the screws.
128_screw_clean.jpg
128_screw_clean.jpg (434.14 KiB) Viewed 3515 times
124_screws_in_place.jpg
124_screws_in_place.jpg (298.8 KiB) Viewed 3515 times

The bedplate needed help. Besides dirt, the shellac had begun to flake and oxidize. I did a lightly damp wipe-down, followed by a light pass with 0000 steel wool.
129_bedplate_B4.jpg
129_bedplate_B4.jpg (409.57 KiB) Viewed 3515 times
The decoration that was missing was still visible as a "ghost image" on the black paint. Using Mica Monster's technique, I touched-in new gold paint using the original outlines as a guide. As a bit of insurance, I also masked-off areas.
146_stripe_repair.jpg
146_stripe_repair.jpg (420.81 KiB) Viewed 3515 times

Some paint was missing around the screw holes and a couple of other areas. I touched that up with a little Nigrosene and shellac.

After all was dry, it was time to build-up protective coats of shellac. I started with amber, to even out the color, then switched to clear.
176_bedplate_first_coat.jpg
176_bedplate_first_coat.jpg (368.12 KiB) Viewed 3515 times
First coat of new shellac.

The silver highlights on most of the type 4 and many of the type 5 patent plates is usually completely gone or largely missing. It was a thin, fragile coating and it was a logical improvement when the Edison company went to using nickel plating in 1906. I like a good patent plate. (Who doesn't?) Toward that end, I decided to try my hand at re-silvering the highlights. I ordered some clock face silvering powder from a clock restorer in England. (This particular plate actually had a fair amount of silver on it and I would have left it as-is were I not doing a total refinish of the case.)

The black paint on the background looked OK, so I elected not to re-paint. Then I used some 600 grit wet/dry sandpaper to clean off the highlights back to shiny brass.
161_plate_brass.jpg
161_plate_brass.jpg (389.79 KiB) Viewed 3515 times
Shiny, isn't it?

After a thorough cleaning with soap and 120 ℉ tap water, I rubbed the powder on and Presto! The highlights were silver once more. In a nod to more permanence, I went ahead and coated the plate with clear lacquer to protect the bright silver.
163_silver_plate.jpg
163_silver_plate.jpg (277.36 KiB) Viewed 3515 times
Matte silver again!

After the shellac had cured on the bedplate, I did a final sand and polish.
002_finished_bedplate.jpg
002_finished_bedplate.jpg (304.74 KiB) Viewed 3515 times
Different, huh?

It took me some time to work up the nerve to mix the Green aniline stain. I decided to try it as a water stain so that the color would not "move" so much when applying the shellac. As I quickly found out, a little green stain goes a long way. I used a test block of Oak to try out the stain strength. It took a while to get it dilute enough so that I could control the amount of color without going straight to "traffic light green".

Before staining, I wiped the case down with water to raise the grain and quench the dry wood's thirst before hitting it with the stain. After a very light sanding, I used a paper towel wad to apply the stain. Once the stain dries, it bears little resemblance to the final color with a top coat. This is an area where one needs to have faith.
154_stained_case.jpg
154_stained_case.jpg (339.79 KiB) Viewed 3515 times
No, it's not going to end up looking like that.
Last edited by martinola on Sat Aug 29, 2015 10:33 pm, edited 1 time in total.

martinola
Victor III
Posts: 953
Joined: Wed Feb 11, 2009 1:30 pm

Re: RESTORATION DIARY: EDISON STANDARD MODEL A #132017

Post by martinola »

After drying, it was time to do a thin flash coat of amber shellac followed by a grain filler. I used an oil-based Walnut colored grain filler from Mohawk. As you can see, even after scraping and some sanding, it darkens up the color.
173_case_filler.jpg
173_case_filler.jpg (319.79 KiB) Viewed 3511 times
As is typical with me, I ended up pulling out too much filler in the scraping and sanding part. This resulted in many coats of shellac, sanding after every 3rd or 4th coat. Along the way, I noticed that the color had drifted somewhat from what I considered a good "green". I mixed up some thinned shellac with about 5 to 8 grains of green stain. This gave me a very dilute shellac stain that I could build up in 2 or 3 applications.
178_Add_green.jpg
178_Add_green.jpg (381.78 KiB) Viewed 3511 times
Boosting the green with shellac stain.

Eventually, I got to the point where the grain was as filled as I was going to get it. Finally it was time for an almost final sand and polish. I was impatient and didn't wait for my buddy to bring me his bag of rotten stone. Once again, I used white auto body polish.
001_lid_polish.jpg
001_lid_polish.jpg (350.71 KiB) Viewed 3511 times
After the polished case had sat for some days, it was time to put on a new case decal. As I've said elsewhere, this was something I had dreaded. The original Edison Banner transfer is a beautiful but intricate thing. It visually dominates the front of the machine and even the best finish can't overcome a mediocre decal. I had collected the three best decals I could find.
010_3_decals.jpg
010_3_decals.jpg (326.34 KiB) Viewed 3511 times
The first was rather a "pig-in-a-poke". It was an original style varnish transfer with the front side under tissue paper. (I bought it about 15 years ago when I first considered re-doing an already OK green oak finish. My sanity returned and so I put it away.) Unfortunately, to see the front of the transfer, one had to actually install it. So I did.
019_apply_decal1.jpg
019_apply_decal1.jpg (315.41 KiB) Viewed 3511 times
021_first_decal.jpg
021_first_decal.jpg (376.78 KiB) Viewed 3511 times
In some ways it was great. In some ways not. I had a hard time deciding which decal would be best overall. Thanks to some careful study, good advice, and a coin toss, I settled on one that seemed to have the most accurate drawing. (The "E" of Edison - most notably.) Still not perfect, but would have do for this project. This necessitated sanding off the transfer and again preparing the surface for the new water-slide decal.

After a brief soak in warm water, I used Micro Sol to aid in the decal application. Then I used Micro Set to help the decal "settle in" and cling to the surface of the case. I applied about 8 more coats of shellac (sanding every 2nd or 3rd coat) to hide the edge of the water slide decal.
005_decal_2.jpg
005_decal_2.jpg (384.78 KiB) Viewed 3511 times
All the way from Peru.

At this point I have no idea how many total coats of shellac I've applied. I can safely say it's well over 15. After a final sand, everything got to sit for a couple of weeks to harden up enough to polish. I've found that refinishing this way with many coats requires a fair amount of curing time for the finish to harden.

In between the case work, I spent time considering the other odd metal parts. The exposed lid hardware was fairly rusty. The clips and latches got a few passes under the wire brush and kissed the polishing wheel a few times. I opted for the quick and easy brush plater for the nickel plating.
007_rusty_latches.jpg
007_rusty_latches.jpg (298.12 KiB) Viewed 3511 times
026_reinstalled_latch.jpg
026_reinstalled_latch.jpg (302.75 KiB) Viewed 3511 times
Latch reinstalled.

The final mechanical assembly went rather quickly. I used some nice belting that Mica Monster had made. I chose a good 2 minute Indestructible cylinder for its first trial run. It wound up nicely and the motor seemed to have good power but I found at the last moment that I had somehow acquired a model B brake lever instead of a model A lever. I didn't realize that the clearances were so tight. With the taller model B brake installed, the carrier arm turned the lever into an auto shut-off device. Very effective, but not what I had in mind. With George's help, a proper brake lever was located and installed.
005_brakes.jpg
005_brakes.jpg (503.25 KiB) Viewed 3511 times
Longer brake is for Model B and later.

martinola
Victor III
Posts: 953
Joined: Wed Feb 11, 2009 1:30 pm

Re: RESTORATION DIARY: EDISON STANDARD MODEL A #132017

Post by martinola »

This type of motor was mounted to the bedplate using natural rubber cushions as shock absorbers. I used medium soft neoprene grommets (cut in half) as modern replacements. Because of the primitive shock mounting, the motor is a bit louder than the later model B type. The machine functions quite well and reminds me what a great machine the New Style model A is.
011_final_case_front_CU.jpg
011_final_case_front_CU.jpg (334.13 KiB) Viewed 3508 times
013_case_final_crankside.jpg
013_case_final_crankside.jpg (354.19 KiB) Viewed 3508 times
014_final_topworks.jpg
014_final_topworks.jpg (317.51 KiB) Viewed 3508 times
018_final_rear.jpg
018_final_rear.jpg (389.4 KiB) Viewed 3508 times
021_still_OK_nr3.jpg
021_still_OK_nr3.jpg (332.22 KiB) Viewed 3508 times
Still OK by inspector 3.
008_final_wide_w_horn.jpg
008_final_wide_w_horn.jpg (282.23 KiB) Viewed 3508 times
Since this was an experiment, I spent a good deal of extra time fooling around with application of the color. I look forward to refining the process of doing an accurate Green Oak finish on future projects. I like the impression of depth you get with aniline stain rather than the grain-hiding effect of pigmented stains. In retrospect, it wasn't as hard to work with as I had feared. It just demanded some experimentation, faith and patience. Big thanks to Ken and George for their help and patience!

Thanks for checking out my project!

Martin

User avatar
phonogfp
Victor Monarch Special
Posts: 7405
Joined: Wed Jan 07, 2009 5:08 pm
Personal Text: "If you look for the bad in people expecting to find it, you surely will." - A. Lincoln
Location: New York's Finger Lakes

Re: RESTORATION DIARY: EDISON STANDARD MODEL A #132017

Post by phonogfp »

Hot damn, Martin, that looks FABULOUS! :)

Really, a top-notch job. Congratulations!

George P.

wjw
Victor II
Posts: 472
Joined: Wed Jan 07, 2009 10:57 pm
Location: greater bubbaville

Re: RESTORATION DIARY: EDISON STANDARD MODEL A #132017

Post by wjw »

Ditto that. Wonderful work and thanks for the slideshow!

User avatar
edisonphonoworks
Victor IV
Posts: 1566
Joined: Wed Oct 21, 2009 10:50 am
Personal Text: A new blank with authentic formula and spiral core!
Contact:

Re: RESTORATION DIARY: EDISON STANDARD MODEL A #132017

Post by edisonphonoworks »

Your post is refreshing, what I like, actual real information. I get more enjoyment out of seeing a looked over machine come back to life than anything!

User avatar
TinfoilPhono
Victor IV
Posts: 1926
Joined: Thu Jan 08, 2009 8:48 pm
Location: SF Bay Area, Calif.

Re: RESTORATION DIARY: EDISON STANDARD MODEL A #132017

Post by TinfoilPhono »

I am SUPER impressed with your restoration skills. Absolutely wonderful job.

User avatar
fran604g
Victor VI
Posts: 3988
Joined: Mon Mar 04, 2013 2:22 pm
Personal Text: I'm Feeling Cranky
Location: Hemlock, NY

Re: RESTORATION DIARY: EDISON STANDARD MODEL A #132017

Post by fran604g »

Thank you, Martin, for sharing the project. This is a great example that shows us all how a seemingly destroyed barn find can be resurrected with a little patience and a healthy dose of fortitude. :)

Very nice!

Fran
Francis; "i" for him, "e" for her
"Even a blind squirrel finds a nut once in a while" - the unappreciative supervisor.

Post Reply