![[The Talking Machine Forum - For All Antique Phonographs & Recordings]](/styles/we_universal/theme/images/the_talking_machine_forum.png)

From Junk To Jewel, Circassian Victrola XVI
-
startgroove
- Victor III
- Posts: 887
- Joined: Sat Apr 20, 2013 3:01 pm
- Location: Coos Bay, Oregon
Re: From Junk To Jewel, Circassian Victrola XVI
The second batch I ordered came from Vintage Veneers, Carmel, Indiana. Cheers, Russie
-
startgroove
- Victor III
- Posts: 887
- Joined: Sat Apr 20, 2013 3:01 pm
- Location: Coos Bay, Oregon
Re: From Junk To Jewel, Circassian Victrola XVI
This latest group of tasks were likely the most difficult parts of this project. A previous examination showed that about one inch had been removed from the front and rear feet, plus the rear feet had been modified by having the outward bulge removed so the shortened legs were squared off. The right rear leg was broken off at the cabinet line and was not present. These problems would be the next thing to make right. But, how to do it? Lori, my regular advisor and encourager, suggested carving or somehow shaping the missing wood pieces.
We went to the hardware store and picked up a contour copy gauge, and used it to find the shapes from another Victrola XVI we had. Solid walnut blocks of wood were shaped and fitted to all four legs. First the front legs where an oval section of solid walnut was shaped and fitted. To increase the strength, I installed four ⅜” hardwood rods deep into each of the front legs. After further shaping and sanding, the two front legs seemed to conform well the original dimensions.
The the broken off rear leg caused much concern. Lori and I discussed the issue over a glass of wine. She suggested that a repair would be strongest if the new section was extended beyond the bottom surface of the cabinet. The next morning, with chisel and drill, I removed all of the stub of the leg for two inches above the bottom surface. Then, using the contour copy gauge, I transferred the cross section, in both axes, to a fresh piece of solid walnut, and using the bandsaw, cut the leg to shape. This was then fitted and trimmed as necessary. Gluing up was easy since the fit was very good. For additional strength, I added four ⅜” dowels all the way through to the original corner post. The other rear leg was repaired in a similar manner, transferring the contours to walnut pieces and then gluing them onto the remaining leg. Again, four dowels lent added strength.
Some final sanding and drilling of the holes for the casters, and then staining, finished this part of the project. It passed Lori’s inspection and so, on to the next portion of the project.
- Attachments
-
- The front leg with the new extension added.
- frontleg.jpg (60.71 KiB) Viewed 872 times
-
- The right rear leg after the extension was added and pegs were installed. The rounding of the lower portion is yet to be done.
- IMG_6570.JPG (98.81 KiB) Viewed 872 times
-
- One of the front legs upon completion.
-
- The right rear leg upon completion.
Last edited by startgroove on Wed Mar 10, 2021 2:11 pm, edited 1 time in total.
-
Inigo

- Victor VI
- Posts: 3779
- Joined: Mon Dec 18, 2017 1:51 am
- Personal Text: Keep'em well oiled
- Location: Madrid, Spain
- Contact:
Re: From Junk To Jewel, Circassian Victrola XVI
How many abilities do you have! What a work! I suppose you'll upload some photos for our envy and enjoyment 
Inigo
-
Curt A
- Victor Monarch Special
- Posts: 6435
- Joined: Fri Jul 09, 2010 8:32 pm
- Personal Text: Needle Tins are Addictive
- Location: Belmont, North Carolina
Re: From Junk To Jewel, Circassian Victrola XVI
Looks good and very sturdy... I wondered how you would add to those legs... Congrats.
"The phonograph is not of any commercial value."
Thomas Alva Edison - Comment to his assistant, Samuel Insull.
"No one needs a Victrola XX, a Perfected Graphophone Type G, or whatever you call those noisy things."
My Wife
Thomas Alva Edison - Comment to his assistant, Samuel Insull.
"No one needs a Victrola XX, a Perfected Graphophone Type G, or whatever you call those noisy things."
My Wife
-
tomb
- Victor IV
- Posts: 1383
- Joined: Sat Oct 24, 2015 10:46 pm
- Location: riverside calif
Re: From Junk To Jewel, Circassian Victrola XVI
Great job.. You are really talented in wood repairs. That phonograph will be a work of love Tom
-
audiophile102

- Victor IV
- Posts: 1219
- Joined: Tue May 12, 2015 12:50 pm
- Personal Text: Say to yourself I am so happy hurray!
- Location: Brookfield, Illinois
Re: From Junk To Jewel, Circassian Victrola XVI
It's really great to see a worthy machine get the attention of a craftsman. Your skills are noteworthy and I thank you for keeping the thread open and updated. 
"You can't take the phonographs nor the money with you, but the contentment the phonographs bring may well make your life better, and happier lives make the world a better place."
-
startgroove
- Victor III
- Posts: 887
- Joined: Sat Apr 20, 2013 3:01 pm
- Location: Coos Bay, Oregon
Re: From Junk To Jewel, Circassian Victrola XVI
After the feet repairs were completed, I began removing the old veneer from the sides, which was not very difficult. It was a self-adhesive sheet and responded well to warming with my hot air blower and a two inch putty blade. After using solvent to remove the glue, the holes and depressions were filled with wood putty and sanded flush.
The first layer to go on was the Poplar Veneer as a crossband. Many years ago, I invented a veneering method for large areas which involved applying two layers of diluted Elmer’s Carpenters Glue to each surface. When dry, a quick wipe with a damp sponge re-softens the glue enough so the veneer can then be positioned and then “Ironed” down. The heat and pressure of the iron reactivates the glue and with careful working with a wood block and a wooden roller, the veneer sticks well. That layer was then sanded to remove any imperfections to the surface.
The next step had Lori and I matching the top layer veneers. We poured a glass of wine and tried various positions and angles to find the best looking patterns. Left and right facing sheets were matched in what is called “book matching”. The sheets were more than wide enough, so it was easy to match the grains in a symmetrical pattern and angle the cuts if necessary, and still have plenty of overlap at the edges. The goal was to find the right angle and section to cut so that a pleasing pattern resulted. Once the patterns were matched, first one then the second sheets were applied with the "iron on" process.
After sanding smooth, we applied Constantines Pore Filler And Stain, let it set up a little and then wiped off the excess.
With the side lower pieces missing, and unlikely that a donor cabinet would be found, so, it was decided that they should be fabricated by a woodworker with the proper skills to duplicate them. They came out very nice and it was worth the cost.
Waiting for the weather to turn drier and warmer, Lori and I laid out all the removable parts and hardware on a table to check condition and to clean up or repair them as needed.
We'll continue with the finish coatings next week.
- Attachments
-
- Removing the old veneer.
- IMG_6532.JPG (122.3 KiB) Viewed 793 times
-
- The prepared side after the holes have been filled in.
- IMG_6576.JPG (124.83 KiB) Viewed 793 times
-
- Fitting the crossband sheet of veneer.
- IMG_6577.JPG (70.28 KiB) Viewed 793 times
-
- Applying the glue with a roller.
- IMG_6616.JPG (137.63 KiB) Viewed 793 times
-
- The beauty layer of veneer as it looks after pore filling and staining.
-
alang

- VTLA
- Posts: 3115
- Joined: Thu Aug 19, 2010 9:36 am
- Personal Text: TMF Moderator
- Location: Delaware
Re: From Junk To Jewel, Circassian Victrola XVI
Wow! Beauty layer, no kidding  Thanks for taking us on this tour and explaining your process!
Andreas
Andreas
-
Inigo
- Victor VI
- Posts: 3779
- Joined: Mon Dec 18, 2017 1:51 am
- Personal Text: Keep'em well oiled
- Location: Madrid, Spain
- Contact:
-
startgroove
- Victor III
- Posts: 887
- Joined: Sat Apr 20, 2013 3:01 pm
- Location: Coos Bay, Oregon
Re: From Junk To Jewel, Circassian Victrola XVI
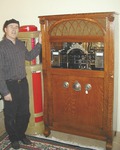
THE FINAL CHAPTER.
After all the veneering was completed, and pore filling/staining processes were performed on the entire cabinet, it was time to apply the finish coats. Actually, before that, we applied a new “Victrola Decal” to the inner lid. This fantastically beautiful decal came from epj24 on Ebay.
Then, a light coat of Watco Oil was applied. Days later a second coat followed. For the next several days, the cabinet and pieces were left to dry until low humidity weather arrived.
Several coats of lacquer finished the coating process. I chose a quart of flat and a quart of gloss, and mixed them, testing various proportions, until I got the semi-gloss appearance that I wanted. After drying for several days, the finish was rubbed and waxed.
The final tasks consisted of assembling all the pieces and parts together. Lori and I spent a relaxing evening on that, all the while chatting, and laughing about how we beat the Corona Virus, and restored several of our machines while we were sequestered.
- Attachments
-
- The finished cabinet. Compare this with the "before" pictures.
- IMG_0754.jpg (104.9 KiB) Viewed 753 times
-
- The back area seems rather plain on this model compared to the beauty of the other sides.
- IMG_0753.jpg (94.81 KiB) Viewed 753 times
-
- View to the front. Note the "Creature" faces.
- IMG_0758.jpg (98.69 KiB) Viewed 753 times
-
- The over-all coloring seems to match well. The lid veneer matches the front veneer.
- IMG_0760.jpg (107.32 KiB) Viewed 753 times
-
- Detail of the left front corner.
- IMG_0756.jpg (116.44 KiB) Viewed 753 times
-
- The lower feet on the right side. Compare this with the pre-restoration photos. The tiger striping is exaggerated by the camera flash. It is really far more subdued.
- IMG_0757.jpg (128.68 KiB) Viewed 753 times
-
- The nearly completed playing compartment. Note the new lid decal.
- IMG_0755.jpg (86.36 KiB) Viewed 753 times
-
- View with all doors open.