![[The Talking Machine Forum - For All Antique Phonographs & Recordings]](/styles/we_universal/theme/images/the_talking_machine_forum.png)

Hello all,
I am awaiting receipt of a Triumph bedplate decal set from Greg Cline. I have looked around the Forum and found some good posts relating to installation of decals on cases and reviewed them, but have some questions with respect to bedplate installation:
1. Based on experience, any extra or different steps where the decals are to be placed on bedplates as opposed to wood cases? (By way of background, the black finish on the bedplate I will be working with is in pretty good shape.)
2. I am thinking that after the decals are installed, it will likely be a good idea to coat them with shellac to blend them in.
a. My assumption is that the shellac should cover the entire bedplate to ensure evenness. Correct? (On mine, the decoration is gone from the lower bedplate, so I would likely remove the upper section first.)
b. How many coats are recommended?
c. Do you cut the shellac or apply it full strength?
d. What do you recommend for applying the shellac to the bedplate in order to avoid any marks or bubbles? I.e., cloth, bristle brush, foam brush, etc. I'm thinking, maybe, white china bristles?
Thanks in advance for the advice.
clay
Installation of bedplate decals--some questions
-
FloridaClay
- Victor VI
- Posts: 3708
- Joined: Wed Jan 26, 2011 7:14 pm
- Location: Merritt Island, FL
Installation of bedplate decals--some questions
Arthur W. J. G. Ord-Hume's Laws of Collecting
1. Space will expand to accommodate an infinite number of possessions, regardless of their size.
2. Shortage of finance, however dire, will never prevent the acquisition of a desired object, however improbable its cost.
1. Space will expand to accommodate an infinite number of possessions, regardless of their size.
2. Shortage of finance, however dire, will never prevent the acquisition of a desired object, however improbable its cost.
-
martinola
- Victor III
- Posts: 964
- Joined: Wed Feb 11, 2009 1:30 pm
Re: Installation of bedplate decals
Hi Clay.
Gregg's decals are great and his instructions will cover most of what you'll need, but to elaborate a little:
For application of shellac, I've had success in using a nice 1" artist's brush. After the decals have been attached and cured, I've brushed amber shellac over the whole bedplate. I've found the amber shellac will build up the depth of color both on the decals but on the bedplate black as well. Once the desired color is achieved, use the clear shellac to build up the protective coating on top. In all cases I've used Zinsser very slightly thinned with denatured alcohol.
It'll take maybe 2 coats of the amber and maybe 3 or 6 coats of the clear with very light sanding (400 grit wet/dry sandpaper) between every 2nd coat. Surface imperfections and brush marks aren't a big deal in that they will be sanded-out along the way. The shellac will need to harden 1 to 2 weeks along the way as you build up layers so it can be sanded. The final coat will need a final sanding (600 grit wet dry sandpaper) followed up by polishing with rottenstone powder or white autobody polish (available at auto supply stores). After that, a little waxing and you're done.
Shellac is very forgiving, but don't be in a hurry - and really don't try to bake it in the oven (been there and done that ). It's great to see your Triumph coming along. I'll be interested to see your progress.
Regards,
Martin
Gregg's decals are great and his instructions will cover most of what you'll need, but to elaborate a little:
For application of shellac, I've had success in using a nice 1" artist's brush. After the decals have been attached and cured, I've brushed amber shellac over the whole bedplate. I've found the amber shellac will build up the depth of color both on the decals but on the bedplate black as well. Once the desired color is achieved, use the clear shellac to build up the protective coating on top. In all cases I've used Zinsser very slightly thinned with denatured alcohol.
It'll take maybe 2 coats of the amber and maybe 3 or 6 coats of the clear with very light sanding (400 grit wet/dry sandpaper) between every 2nd coat. Surface imperfections and brush marks aren't a big deal in that they will be sanded-out along the way. The shellac will need to harden 1 to 2 weeks along the way as you build up layers so it can be sanded. The final coat will need a final sanding (600 grit wet dry sandpaper) followed up by polishing with rottenstone powder or white autobody polish (available at auto supply stores). After that, a little waxing and you're done.
Shellac is very forgiving, but don't be in a hurry - and really don't try to bake it in the oven (been there and done that
Regards,
Martin
-
Bruce
- Victor III
- Posts: 578
- Joined: Mon Jan 02, 2012 9:15 pm
- Location: Vancouver, Canada
Re: Installation of bedplate decals--some questions
Clay
I agree with Martin's recommendations, which will result in a very nice finish.
One thing to keep in mind is the date of your Edison. Lacquer became a common replacement for shellack in about 1909. If you have a later machine try thin layers of spray lacquer to build up to the same appearance as Martin described.
Bruce
-
FloridaClay
- Victor VI
- Posts: 3708
- Joined: Wed Jan 26, 2011 7:14 pm
- Location: Merritt Island, FL
Re: Installation of bedplate decals--some questions
Thanks all for the helpful information.
As best as I can tell, it is an early Triumph D, so I think it probably left the factory in 1908. I used Zinsser amber shellac and it turned out pretty well, although next time I might cut it a bit more to get a smoother flow. There are some ripples.
Greg's decals are great and, fortunately, he sends some extra pieces. I found out that getting those long and very thin stripe decals straight is a pain and I ruined a few along the way until I got better at it, but had enough.
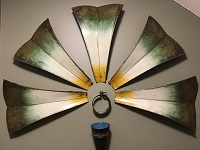
All in all, the Triumph is moving along. Waiting now for Eduardo to finish my horn bell. He says it is taking longer because it is winter there and the coats of shellac take longer to dry properly. Then will come making sure that the bell and the repro elbow mate properly before getting the elbow grain painted, so completion is still a month or two away. When it is all done I will try to post a video.
Clay
As best as I can tell, it is an early Triumph D, so I think it probably left the factory in 1908. I used Zinsser amber shellac and it turned out pretty well, although next time I might cut it a bit more to get a smoother flow. There are some ripples.
Greg's decals are great and, fortunately, he sends some extra pieces. I found out that getting those long and very thin stripe decals straight is a pain and I ruined a few along the way until I got better at it, but had enough.
All in all, the Triumph is moving along. Waiting now for Eduardo to finish my horn bell. He says it is taking longer because it is winter there and the coats of shellac take longer to dry properly. Then will come making sure that the bell and the repro elbow mate properly before getting the elbow grain painted, so completion is still a month or two away. When it is all done I will try to post a video.
Clay
Arthur W. J. G. Ord-Hume's Laws of Collecting
1. Space will expand to accommodate an infinite number of possessions, regardless of their size.
2. Shortage of finance, however dire, will never prevent the acquisition of a desired object, however improbable its cost.
1. Space will expand to accommodate an infinite number of possessions, regardless of their size.
2. Shortage of finance, however dire, will never prevent the acquisition of a desired object, however improbable its cost.