Page 1 of 2
Aeolian Vocalian Reproducer Rebuild
Posted: Fri Jul 28, 2023 2:53 pm
by Lah Ca
Has anyone done a rebuild on an Aeolian Vocalion reproducer?
If yes, is there anything special/unique to watch out for during a rebuild job?
I just scored a spare AV reproducer, along with the fragile and easily damaged U-joint elbow that connects the reproducer to the arm. Both appear to be in quite good condition.
Unfortunately they are chrome (or nickle) plated rather than gold like the ones on my machine. But I don't think the records will care.
Also unfortunately the reproducer is missing the thumb screw from the needle chuck.
There are lots of rebuild tutorials on Youtube for Victor and Columbia, and other common reproducers. In the abstract, reproducers mostly seem to be the same. In the specifics, they can differ in how they come apart, in whether there are springs or not, and in what the diaphragms are made of. Also sizes of diaphragms and gaskets are different.
There is not a lot of rebuild information specific to an AV reproducer. From the outside, the construction of the reproducer looks quite simple, which suggests that the rebuild job will be, too.
Online, I can find mica diaphragms that will fit--the descriptions say they fit. I can not find any specific gaskets, however.
Any ideas, advice, suggestions?
It is nice to have a spare work on.

- Screenshot from 2023-07-28 11-28-53.png (529.08 KiB) Viewed 3544 times

- Screenshot from 2023-07-28 11-29-17.png (484.1 KiB) Viewed 3544 times
Re: Aeolian Vocalian Reproducer Rebuild
Posted: Fri Jul 28, 2023 3:42 pm
by Inigo
my experience as an AV owner... the reproducer is of the most common type, no need for special features. Good mica, soft gasket tube and patience, and you'll have s very efficient reproducer
Re: Aeolian Vocalian Reproducer Rebuild
Posted: Fri Jul 28, 2023 7:33 pm
by Lah Ca
Inigo wrote: Fri Jul 28, 2023 3:42 pm
my experience as an AV owner... the reproducer is of the most common type, no need for special features. Good mica, soft gasket tube and patience, and you'll have s very efficient reproducer
Thanks.
Looking over the spare without taking it apart, I think I need a new mica diaphragm (there is a bit of separation of the mica around where the needle arm attaches), two round O-ring type gaskets, one flat round gasket, and some wax.
Re: Aeolian Vocalian Reproducer Rebuild
Posted: Fri Jul 28, 2023 9:05 pm
by Curt A
No need for O ring gaskets - normal Victor gasket tubing can be cut to fit...
Re: Aeolian Vocalian Reproducer Rebuild
Posted: Fri Jul 28, 2023 9:48 pm
by Lah Ca
Curt A wrote: Fri Jul 28, 2023 9:05 pm
No need for O ring gaskets - normal Victor gasket tubing can be cut to fit...
Thanks.
The originals appear to be O-rings, but there is no obvious reason that the Victor gasket tubing wouldn't work. All that would be required is the skill in cutting it to length.
Re: Aeolian Vocalian Reproducer Rebuild
Posted: Tue Aug 01, 2023 2:24 pm
by Lah Ca
The screws were a bit seized up so I treated them to a drop or two of penetrating oil over a number of days. Then it all came apart very easily.
Curiously, the exterior diaphragm gasket is an O-ring while the internal one is gasket tubing.
Maybe the more expensive O-ring with no seam looked nicer on the outside, while the tubing, functionally indistinguishable, was good enough on the inside where cosmetics were not important.
Anyway, I am shopping for parts.
Re: Aeolian Vocalian Reproducer Rebuild
Posted: Fri Aug 11, 2023 8:00 pm
by Lah Ca
It is done, and WOW!!! I thought the machine sounded good before. And I wasn't entirely wrong. It did sound good, but now it sounds great!
The general tricky bits for a first timer doing a reproducer rebuild for this type of unit are getting the gasket tubing cut to the right length and knowing how much wax is enough and how much is too much.
The big tricky bit specific to an AV machine rebuild is that it is not possible simply to unscrew the back flange from the reproducer while the arm is all assembled. Dumb engineering design!
You must either remove the back flange piece from the U-elbow first or remove the U-elbow and then remove the back flange piece from the elbow.
The second and more complicated option, taking the U-elbow off, is the one to go with; it is much safer.
In each of the U-elbow joints there are a ball bearing and a leaf spring that applies force against the ball bearing.
The joint with the back flange piece is harder to get apart and back together again, especially while it is on the machine; some care and minor force is required.
Great care needs to be taken with the U-elbow; my understanding is that it is the weak point for pot metal fatigue in the arm as a whole.
The joint at other end of the U-elbow where it attaches to the arm is easier to take apart and get back together without much force, although it sort of takes three hands to get the ball bearing back into the joint.
Only when the back flange piece is separated from the U-elbow can you remove the screws for the back flange.
I got mica diaphragms and gasket tubing for a Victor Exhibition reproducer -- exact fits for the AV reproducer.
I could not find a new back flange gasket so I treated it with the sort of rubber refresh liquid used for tape deck and laser printer rollers. It came up nice and clean and quite pliable if still somewhat squashed.
I was also able to clean all the old dried up grease out of the joints for the U-elbow and re-lubricate them.
I noticed during the process of doing this there is a small nut missing from one the screws that hold the needle arm in place on the original reproducer. I need to find one. I also need to find a thumb screw for the needle arm, as the spare, now rebuilt on the machine, came without one. But these are other stories.
Re: Aeolian Vocalian Reproducer Rebuild
Posted: Sun Oct 01, 2023 9:57 pm
by Lah Ca
Today, I finally had parts and time to start work on the reproducer that is original to my machine.
The one I rebuilt earlier (above) was the spare.
Apart from different finishes, the two reproducers are very similar but not identical in their construction. All the big parts are the same but they are put together slightly differently:
- On the spare, one of the gaskets was an O-ring, the other not. On the original both are cut tubing, very old and brittle cut tubing.
On spare there was no adhesive used on the gaskets. On the original, it looks as if there was thin coat of something like shellac applied to the gaskets before the diaphragm was set in.
On the spare, there were no washers between the diaphragm and the needle arm and its retaining screw. On the original, there are two very small and very, very thin washers.
On the spare wax was used on the needle arm and its screw to secure it. On the original, it looks like shellac was used--it was much harder to get apart.
The diaphragms themselves look identical in thickness, size and colour. The diaphragm on the original is in much better condition and could probably be reused if needed.
A Question:
How tight should the rocker/pivot pins for the needle arm be?
I assume the needle arm should move freely from side to side with as little front to back movement as possible.
Re: Aeolian Vocalian Reproducer Rebuild
Posted: Mon Oct 02, 2023 10:37 am
by OrthoFan
Lah Ca wrote: Sun Oct 01, 2023 9:57 pm
................
How tight should the rocker/pivot pins for the needle arm be?
I assume the needle arm should move freely from side to side with as little front to back movement as possible.
It should move freely in the direction required to track the record, but there should be no noticeable movement or "shake" in the sideways movement.
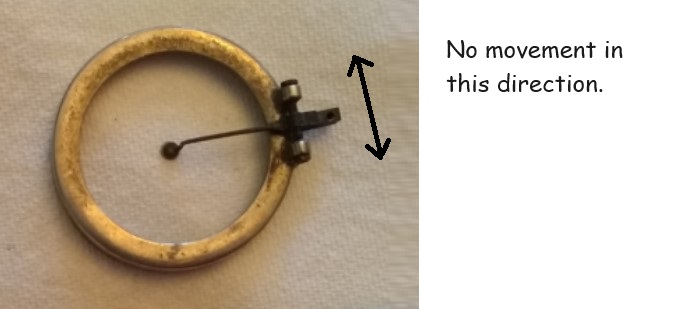
- Screenshot 2023-10-02 073331.jpg (38.86 KiB) Viewed 3255 times
HTH
OF
Re: Aeolian Vocalian Reproducer Rebuild
Posted: Mon Oct 02, 2023 10:47 am
by Lah Ca
OrthoFan wrote: Mon Oct 02, 2023 10:37 am
Lah Ca wrote: Sun Oct 01, 2023 9:57 pm
................
How tight should the rocker/pivot pins for the needle arm be?
I assume the needle arm should move freely from side to side with as little front to back movement as possible.
It should move freely in the direction required to track the record, but there should be no noticeable movement or "shake" in the sideways movement.
Screenshot 2023-10-02 073331.jpg
HTH
OF
Thank you for the reply.
It confirms my inexperienced mechanical intuition.