![[The Talking Machine Forum - For All Antique Phonographs & Recordings]](/styles/we_universal/theme/images/the_talking_machine_forum.png)

That connector is from the 1940's. Someone added that connector so that a commonly available portable radio B battery could be used for the C bias on this set.rebrands wrote:I'e been busy entertaining three granddaughters, ages 7, 5, and 2 today. For some reason they take priority over radios, so I'm doing this after their bedtime. Their parents get them back Sat. Exhausting and exhilarating.I never thought of zapping a transformer to revive it. I've nothing to lose. I'll let you know the outcome. I'm not too hopeful as it looks to have been overheated previously - bubbly tar.I fixed a audio transformer one time by zapping it.
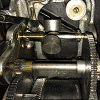
I did this by charging up a large electrolytic capacitor to 90 volts and the connecting the leads to the open winding of the transformer, the resulting arc welded the open coil and then it showed continuity.I've not yet located any connection corresponding to the C+ label on the schematic.Positive goes to +C at the midpoint of the last two 71 filaments on the right in the schematicThe wire pair/connector is in the attached photo, but a battery connection may be a possibility.What type of plug/connector is coming out of the chassis? Three pin? Some of the old radio batteries had the mating plug on themMost interstage transformers list their ratio as 1:2 or 1:3, rather than 2:1, 3:1. I assume that is the primary to secondary ratio. If so I would need to reverse a 1:2 to arrive at a 2:1 winding ratio. Maybe two transformers in series or parallel to arrive at the winding arrangement I need?For the interstage transformer use a standard 3:1 center tapped unit from Hammomd or Stancor. The center tap goes to the negative terminal bias battery (C-) the positive terminal goes to the C+ terminal. The schematic indicates this, you also have a -3v bias that needs to be connected for the first audio tube.
I am mystified why the two pairs of output tubes would be biased differently. They look balanced to me, but maybe the way the filaments are powered as mentioned?The three volt bias is adjusted with an external pot.doesn't show the voltage dividers and circuits used to produce the lower voltages and negative grid bias voltages. "IF" this is for use on Household DC voltage, then there has to be another chassis with the resistors and inductors needed to provide the various voltages to the points on the schematic as shown.
I've attached a couple scans of a schematic I have drawn up. It isn't complete, still have more wire tracing to do in the area of V4 and V5. I think the filament circuit diagram should shed some light on the voltage dropping required. The 65 ohm center tapped resistor in parallel with the field coil is a monster, mounted on the bottom of the cabinet with a patch of ASBESTOS insulating it from the cabinet, and a wire mesh to keep from touching it. Yeah, I hate the style of the original schematic and don't grasp the "dual grids" around the plates.
As for the 3:1 transformer ratio, back in the 1920's a transformer with a 20,000 turn primary and a 60,000 turn secondary would have been called 3:1. Sort of like capacitors being called "condensers". Sorry if my use of these obsolete terms is confusing.
The Stancor transformer that I mentioned in my earlier post will do the trick, though.
It looks like the C+ connection on your set should go to earth (chassis ground).