![[The Talking Machine Forum - For All Antique Phonographs & Recordings]](/styles/we_universal/theme/images/the_talking_machine_forum.png)

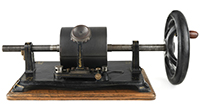
Restoration: Edison Standard Model A #S169852
-
cmshapiro
- Victor I
- Posts: 115
- Joined: Wed Oct 28, 2015 4:12 pm
Re: Restoration: Edison Standard Model A #S169852
I like the "wear" on the signature decal. I makes it look more realistic for a 110+ year old machine.
-
stevenhman
- Victor I
- Posts: 124
- Joined: Fri May 06, 2016 1:49 am
- Location: Raleigh, NC
Re: Restoration: Edison Standard Model A #S169852
Thanks, the next morning I wasn't so mad at myself about it. I gave them a couple coats of amber shellac to match the rest of the bedplate and am carrying on.cmshapiro wrote:I like the "wear" on the signature decal. I makes it look more realistic for a 110+ year old machine.
-
Victrolacollector
- Victor V
- Posts: 2713
- Joined: Fri Nov 18, 2011 11:23 pm
- Location: NW Indiana VV-IV;
Re: Restoration: Edison Standard Model A #S169852
I also like the wear on the decal, I would leave it.
-
stevenhman
- Victor I
- Posts: 124
- Joined: Fri May 06, 2016 1:49 am
- Location: Raleigh, NC
Re: Restoration: Edison Standard Model A #S169852
It's been a while since I've updated this.
I kept putting coats of shellac on, sanding it down, another couple of coats, sanding... I'm not sure what I was doing that wasn't quite right but I could never get a good even surface finish. After what I thought was my 'final' coat I got a bit too aggressive with the sanding and scratched up the finish more than could be buffed out with 000 steel wool and stratch X. I got fed up and just put everything back together.
As my luck would have it, as soon as I closed the end gate, the spring on the gate completely chipped off all the paint & shellac from where it rubbed against it (this was after 2+ weeks of 'curing' the finish). I said F it and just used some sharpie to cover up the blemish. The other machines I have are also in pieces or need other work to get them running and I just want to listen to some flipping records already.
In the end I learned a lot of really good lessons on what to do and what not to do, so there's that positive bit. I'm not sure how well it shows up in pictures, but the scratches are really noticeable in person.
I cleaned up the light surface rust with some scotch brite before assembly.
I was in a bit of a hurry to get things back together so I didnt take pictures while putting the new motor insulators from Ron Sitko in, nor did I re-black the screws.
Finally all back together. Runs very well, I just need to adjust the mandrel shaft gear position as the mandrel shaft gate end bearing point is canted a bit too much to engage the bearing in the gate.
Here's the mess I made to quickly fix the thumping spring before taking it to a school and after I've cleaned it up. Still some light surface rust on the governor, but I have to pull that assembly later anyways to fit a new shaft (the gear is very worn).
I kept putting coats of shellac on, sanding it down, another couple of coats, sanding... I'm not sure what I was doing that wasn't quite right but I could never get a good even surface finish. After what I thought was my 'final' coat I got a bit too aggressive with the sanding and scratched up the finish more than could be buffed out with 000 steel wool and stratch X. I got fed up and just put everything back together.
As my luck would have it, as soon as I closed the end gate, the spring on the gate completely chipped off all the paint & shellac from where it rubbed against it (this was after 2+ weeks of 'curing' the finish). I said F it and just used some sharpie to cover up the blemish. The other machines I have are also in pieces or need other work to get them running and I just want to listen to some flipping records already.
In the end I learned a lot of really good lessons on what to do and what not to do, so there's that positive bit. I'm not sure how well it shows up in pictures, but the scratches are really noticeable in person.
I cleaned up the light surface rust with some scotch brite before assembly.
- With the flash on
I was in a bit of a hurry to get things back together so I didnt take pictures while putting the new motor insulators from Ron Sitko in, nor did I re-black the screws.
Finally all back together. Runs very well, I just need to adjust the mandrel shaft gear position as the mandrel shaft gate end bearing point is canted a bit too much to engage the bearing in the gate.
Here's the mess I made to quickly fix the thumping spring before taking it to a school and after I've cleaned it up. Still some light surface rust on the governor, but I have to pull that assembly later anyways to fit a new shaft (the gear is very worn).
-
Curt A
- Victor Monarch Special
- Posts: 6892
- Joined: Fri Jul 09, 2010 8:32 pm
- Personal Text: Needle Tins are Addictive
- Location: Belmont, North Carolina
Re: Restoration: Edison Standard Model A #S169852
All things considered, it's a very nice restoration... My first project went similar to yours, but it's a learning experience and it gets better after the first...
"The phonograph is not of any commercial value."
Thomas Alva Edison - Comment to his assistant, Samuel Insull.
"No one needs a Victrola XX, a Perfected Graphophone Type G, or whatever you call those noisy things."
My Wife
Thomas Alva Edison - Comment to his assistant, Samuel Insull.
"No one needs a Victrola XX, a Perfected Graphophone Type G, or whatever you call those noisy things."
My Wife
-
stevenhman
- Victor I
- Posts: 124
- Joined: Fri May 06, 2016 1:49 am
- Location: Raleigh, NC
Re: Restoration: Edison Standard Model A #S169852
Thanks Curt! I've got a couple more to do, which are in poor shape. I'll try the asphaltum paint on the next one
-
tomb
- Victor IV
- Posts: 1424
- Joined: Sat Oct 24, 2015 10:46 pm
- Location: riverside calif
Re: Restoration: Edison Standard Model A #S169852
You did a great job restoring the machine. If it were mine it looks like a little aging and I would quit.. I have restored several standard A s and could not get them to factory looks. I am not a pro either just someone who enjoys the hobby.. On a error like that one you would probably be the only one to see the error. You could get a fine gold pin and touch it up instead of replacing the decal, just try to get a pen color to match then add some shellac on top. Sometimes repairing an error can snow ball and add more problems. Tom B
-
briankeith

- Victor IV
- Posts: 1874
- Joined: Mon Jul 25, 2011 8:27 am
- Personal Text: Jeepster
- Location: Blairstown, New Jersey 07825
Re: Restoration: Edison Standard Model A #S169852
I have an old school body shop friend that actually hands stripes the bedplates after painting - I'm not a big fan of decals myself.
-
stevenhman
- Victor I
- Posts: 124
- Joined: Fri May 06, 2016 1:49 am
- Location: Raleigh, NC
Re: Restoration: Edison Standard Model A #S169852
Thanks for the kind words y'all! I have a sneaking suspicion if I don't look at it for a few days the problems won't bother me too much any more.
Next time I'll try painting on the pin striping/bushes myself and if that's no good I'll find someone more artistically inclined to hand paint. Now I get to spend most of Labor Day in the basement listening to a bin full of records while cataloging them
Next time I'll try painting on the pin striping/bushes myself and if that's no good I'll find someone more artistically inclined to hand paint. Now I get to spend most of Labor Day in the basement listening to a bin full of records while cataloging them