![[The Talking Machine Forum - For All Antique Phonographs & Recordings]](/styles/we_universal/theme/images/the_talking_machine_forum.png)

SOLD: Edison Oak Amberola III Parts - Various $
-
tom
- Victor Jr
- Posts: 28
- Joined: Thu Nov 05, 2015 1:01 am
Re: SOLD: Edison Oak Amberola III Parts - Various $
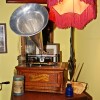
Restored Amberola III.
- Attachments
-
- Restored Amberola III
-
fran604g
- Victor VI
- Posts: 3995
- Joined: Mon Mar 04, 2013 2:22 pm
- Personal Text: I'm Feeling Cranky
- Location: Hemlock, NY
Re: SOLD: Edison Oak Amberola III Parts - Various $
Great job!
Francis; "i" for him, "e" for her
"Even a blind squirrel finds a nut once in a while" - the unappreciative supervisor.
"Even a blind squirrel finds a nut once in a while" - the unappreciative supervisor.
-
Crank_it_up
- Victor III
- Posts: 617
- Joined: Thu May 01, 2014 8:34 pm
- Location: South Florida
Re: SOLD: Edison Oak Amberola III Parts - Various $
Great job, Tom. I’m glad to see it with 4 legs on the floor!
Joe
Joe
-
Valecnik
- Victor VI
- Posts: 3872
- Joined: Sat Jan 10, 2009 3:28 pm
- Personal Text: Edison Records - Close your eyes and see if the artist does not actually seem to be before you.
- Location: Česká Republika
- Contact:
Re: SOLD: Edison Oak Amberola III Parts - Various $
Tell us how you did it please. Nice work. I would have parted it out too as the seller originally planned.
-
marcapra

- Victor V
- Posts: 2180
- Joined: Thu Jun 28, 2012 12:29 am
- Personal Text: Man who ride on tiger find it very difficult to dismount! Charlie Chan
- Location: Temecula, CA
Re: SOLD: Edison Oak Amberola III Parts - Various $
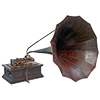
Did you amputate that A-150 in the background to get the legs for this? Anyway, great job!
-
tom
- Victor Jr
- Posts: 28
- Joined: Thu Nov 05, 2015 1:01 am
Re: SOLD: Edison Oak Amberola III Parts - Various $
Regarding the restoration of the Amberola III. I started with the basic unit from Joe. I then looked for a Diamond Disc model 150 and finally got one from Brice Paris. Before taking off the legs, I re-glued any shaky aspects of the lower cabinet of the DD. I did "amputate" the four legs using a miter saw, clamps and a small piece of wood to keep the saw cuts even. I kept the sawdust from these cuts for use later on. I took off the cabinet's lid and turned it over with the feet pointing up. I centered the spot on each leg (total of 8) where I would drill ⅜" holes, ¾" deep. When drilling, make sure the legs do not move. Otherwise the dowel holes will be not be tight. I filled the holes with Gorilla glue and evened out the glue with a toothpick. Then I glued the dowels (1 ½" long) and put everything together with the long legs now pointing up. I hammered on the metal caps of the legs to make sure everything was seated properly and then carefully turned over the entire unit and let the weight of the cabinet press down on the new legs. I did not use clamps. I removed any excess glue. After drying for two days, in order to fill in any gaps between the new legs and cabinet, I put the unit on its side and put glue ( a special super glue I use on wood) on each joint of each leg where it was attached to the cabinet. I then pressed in by hand the sawdust left over from the sawing of the legs. I used a toothpick to horizontally press in and smooth out the glued-in sawdust. After two days of drying I lightly sanded these joints.
That's about it. Unless you knew there was a repair, it would be hard to spot. Very sturdy--not shaky at all.
I hope this might be helpful to someone in the future.
Cheers.
Tom
That's about it. Unless you knew there was a repair, it would be hard to spot. Very sturdy--not shaky at all.
I hope this might be helpful to someone in the future.
Cheers.
Tom
-
Crank_it_up
- Victor III
- Posts: 617
- Joined: Thu May 01, 2014 8:34 pm
- Location: South Florida
Re: SOLD: Edison Oak Amberola III Parts - Various $
And that, Folks, is exactly why I sold it to Tom. I’ll now be looking for an even tougher project to bring to Orlando for you in January! Once again congrats on a job well done.
Joe
Joe