![[The Talking Machine Forum - For All Antique Phonographs & Recordings]](/styles/we_universal/theme/images/the_talking_machine_forum.png)

How to change and re grease springs
-
Victrolaman

- Victor II
- Posts: 297
- Joined: Fri Jun 18, 2010 3:41 pm
How to change and re grease springs
I thought it would be great to star a post about restoring and regressing victrola springs. There are a lot of new members on here and some long timers that I'm sure if they knew how would do it. Anyone have any pictures of it being done or any info, post it for all to see
-
MicaMonster

- Victor III
- Posts: 847
- Joined: Sat Feb 28, 2009 12:52 pm
- Personal Text: Never Settled
- Location: Rochester, NY
- Contact:
Re: How to change and re grease springs
I'm not an old-timer, but I can certainly lend some information.  Replacing phonograph springs can be Easy or Dangerous. Victor/Victrola springs, for the most part, one can install with relative ease because the springs are made of thinner steel, and are meant to be easy to wind. All of those illustrations we've seen of the talking machine jobber wearing a white laboratory coat and bow tie cleanly changing out a bad spring....well, those were all Victor springs I am quite sure. Out of frame, the tech was probably smiling because he WASN'T doing an Edison spring! Edison & Columbia disc and cylinder phonograph springs are thicker, and if they let loose from the spring barrel when removing/installing, they can slap you across the face with a greasy bite and make you cry "UNCLE!" I once had a spring from an Edison Opera let loose on me once (the only time, actually, that a phonograph spring got the better of me), and my heart still palpitates as I recall the images of a twirling steel tornado forming on my workbench.....picking up cows, old Dodge trucks, and farm implements and flinging them into oblivion.
So, before I get more long winded, I'll describe how to make the basic lubricant that I use to grease springs. 70% Vaseline (petroleum jelly) and 30% #2 flake graphite powder. Mix together OUTSIDE (graphite powder likes to get into the air, and cover everything in the shop!) in an old jar with a screwdriver that you don't care about. Mix well.
BASIC steps to replacing a bad spring:
1. Remove turntable, and allow motor to run down completely. You do not want ANY power in the spring barrels when you remove them.
2. Remove spring barrels. This generally involves removing 1 or 2 screws which lock the central arbor shaft in place, and then slide the shaft out carefully and lift out the spring barrel.
3. Most spring barrels will be screwed together, or have a protective cover on them which is tapped in place. In this step one must exercise discretion in how to remove the cap. Some unscrew, some you tap off with a brass (or wood) drift, and some (like early VTM barrels) will require further disassembly, removing a spur gear and pin from the winding shaft.
4. Some spring arrangements will have the center winding arbor attached to the spring barrel cover. In this case, you have to carefully pull it out, catch the leading length of the spring with your other hand, and carefully guide it out of the spring barrel. I like to do this procedure over an old metal wash tub or a large 50 gallon garbage can, in case clumps of grease come out with the spring. You don't want to accidentally step into the stuff, and track it through your house.....it makes the wife mad. TAKE NOTE OF THE DIRECTION THE OLD SPRING WAS INSTALLED. Some springs, you will want to remove while holding the spring barrel in a table vise tightly. These thicker springs are under HIGH TENSION, and should be removed patiently by someone with strong hands.
I know that a conflicting "old dude" method is to throw the spring barrel into a garbage can, and have the spring explode out of the barrel. As fun as this may be, it isn't right....like putting toilet paper on your bathroom dispenser in the non-kosher "under" feed. Its "UP and OVER" for gosh sakes. Its the right way, and the ONLY way. Ok?
4.5 NEW phonograph springs come compressed, held together with a steel clip. DO NOT remove the clip with your hands, as the spring will expand and catch your fingers, hair, cut up things, and make your friends wonder WHY you did such a stupid thing. Put the spring in a bench vise, resting with the steel clip sitting above the grips of the vise. Tighten the vise lightly. Now, use a small hammer and tap the spring DOWN into the vise and out of the steel clip. Hold onto the steel clip, because it will *PING* off the spring. The vise will hold the compressed spring. Just open the vise slowly, (which will unwind the spring), and remove the spring. Nifty skifty.
5. Ok. In step #5, I assume you have not made a return trip from the Emergency Room, with 20 stitches and corrective surgery. So, we will continue. Before you install the new spring, you will want to put a little curved bend in the end of spring, just to make it easier to re-hook it onto the little pin or hook in the spring barrel. Some can be installed on a workbench by hooking the end of the spring onto the hook/pin on the spring barrel itself, and slowly winding the spring into the barrel, bending it and rotating the barrel as you go to completion. DO NOT grease the spring as you work. Put one or two fat fingertipfulls (great word, no?) of graphite lubricant into the first 2-4 inner coils of the spring, before you complete re-assembly and installation. When you first wind the spring, the grease will spread from the center coils to the rest of the spring.
Heavier springs will require you to hold the spring barrel tightly in a bench vise. This will require some tact to get the spring hooked onto its pin (on the barrel), and carefully wind it into the barrel. If you have to put a spring barrel into a bench vise, then this is an indication of the danger level if the spring slips out of your hands. This is why I do not grease springs as I install them, only After they are installed.
6. If your spring barrel has a center arbor shaft that also needs to be installed, now is the time to do it. Turn it (you might need to use plyers) until it catches the center hole on the inside coil of the spring.
Ok, if you have made it this far in the MicaMonster School of Spring Barrel Service (and you have all ten of your digits still in working order), then you can do just about anything mechanical. Well, almost!
Every phono manufacturer has a varying method for spring utilization. Some wind via the center arbor shafts, some wind up by spinning the spring barrel! You will definitely want to take notes on how you disassembled the spring, in case you get lost during the process.
There is so much more to this subject, I just thought I would give this thread a little hop start.
Wyatt
-Antique Phonograph Reproducer Restorer-
http://www.EdisonDiamondDisc.com
Taming Orthophonics Daily!
http://www.EdisonDiamondDisc.com
Taming Orthophonics Daily!
-
gramophoneshane
- Victor VI
- Posts: 3463
- Joined: Wed Jan 07, 2009 3:21 pm
Re: How to change and re grease springs
There's already quite a few threads covering spring removal, regreasing & reinstalation in the technical section of the board, including a video or two that I made, but I'm sure you already know about these from your 2 friendsVictrolaman wrote:I thought it would be great to star a post about restoring and regressing victrola springs. There are a lot of new members on here and some long timers that I'm sure if they knew how would do it. Anyone have any pictures of it being done or any info, post it for all to see
There is also a copy of the service notes for the Edison disc motor in the achives section with step by step instructions covering the subject.
http://forum.talkingmachine.info/viewto ... f=4&t=1133
-
Victrolaman
- Victor II
- Posts: 297
- Joined: Fri Jun 18, 2010 3:41 pm
Re: How to change and re grease springs
Wyatt,
That's one of the best descriptions and in detail I ever read, thanks so much m sure a lot of the fellow members will find this helpful.
That's one of the best descriptions and in detail I ever read, thanks so much m sure a lot of the fellow members will find this helpful.
-
Victrolaman
- Victor II
- Posts: 297
- Joined: Fri Jun 18, 2010 3:41 pm
Re: How to change and re grease springs
Shane,
Yes I have and I watched your video, thank you.
Yes I have and I watched your video, thank you.
-
bob27556

- Victor I
- Posts: 153
- Joined: Wed Jan 07, 2009 6:28 pm
- Location: Northeastern NJ
Re: How to change and re grease springs
This is a method I like for loading Victor springs. This was posted on another forum several years ago but has since been lost. Shane, please don't get on my case again!! I'm only throwing an alternative out there.
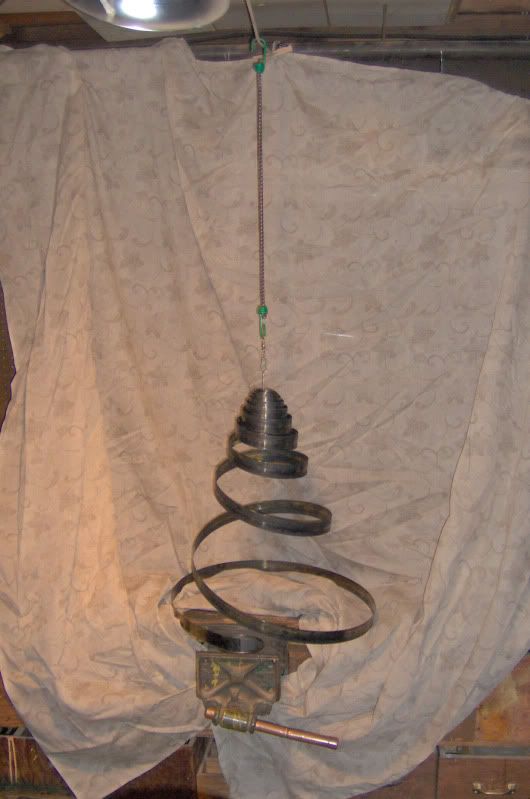
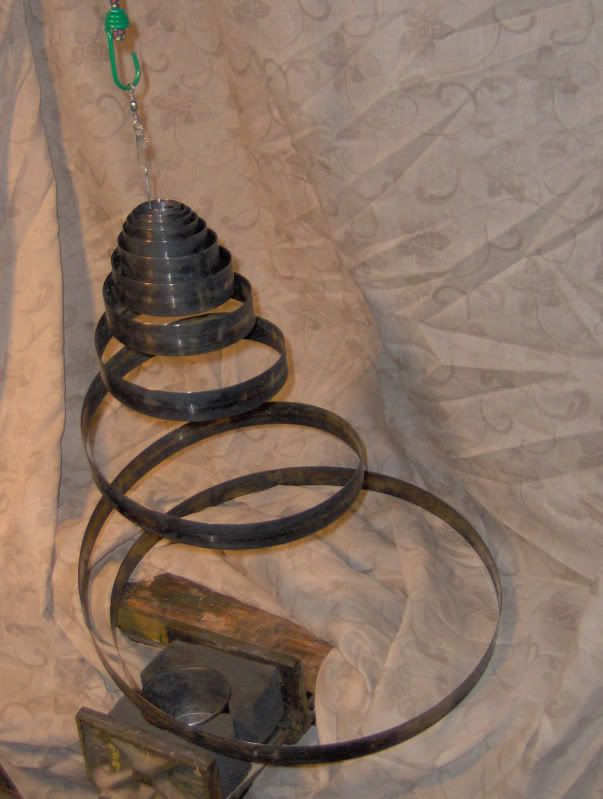
I’ve used the method of spring installation described in ‘The Complete Talking Machine’ once and only once while installing the first of 2 springs into a Victrola VI barrel. After cleaning up the mess I immediately sought an alternative method and the following photos show what I did.
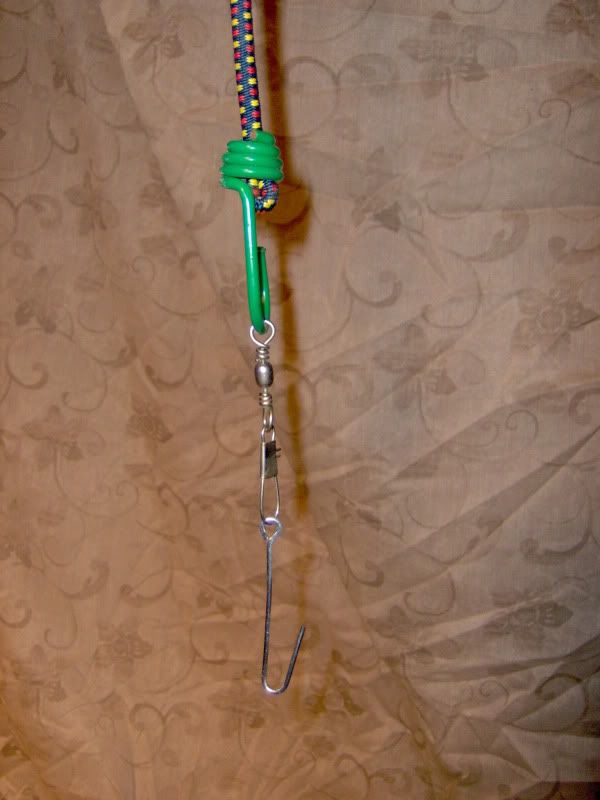
First, I suspended a bungee over my woodworking vise. The bungee is suspended from a rope tied to a pipe on one end and held by a steel eyelet on the other. That allows me to move the bungee perpendicular to the vise.
A heavy duty fishing swivel hangs from the bungee. From the swivel hangs a hook made of coat hanger wire. This hook holds the spring suspended over the vise.
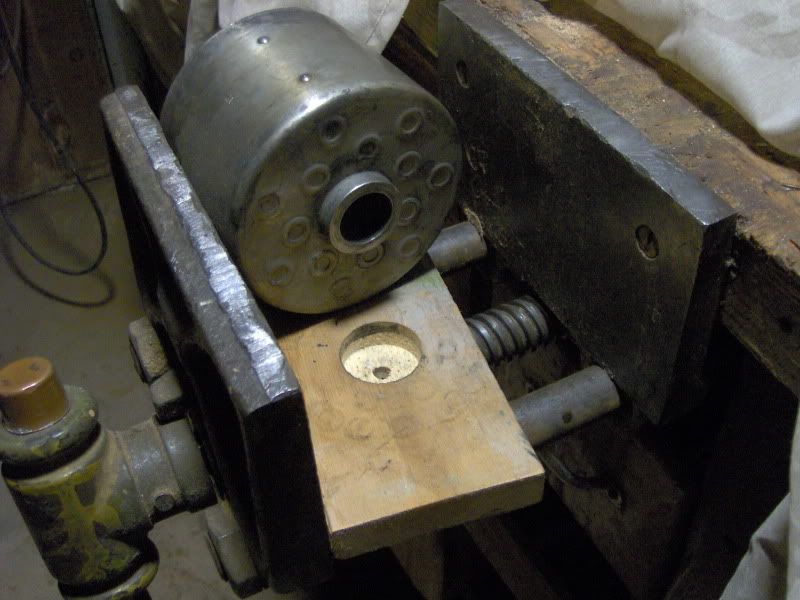
The barrel sits on a piece of plywood with a hole drilled to receive the axle boss. A V-shaped piece of foam is on either side of the barrel to hold it in place without too much pressure.
With all of this in place I then grease the spring and barrel. At this point I hook the spring to the inside of the barrel and begin to load. As you feed the spring in, the swivel allows it to turn. As tension increases, the bungee stretches and as I approach the last few windings I pull down on the bungee to unhook the spring. The last few windings will almost fall into place.
We all have our preferred methods of doing things. My phono hobby is mostly a winter time activity so I work with springs in my basement. I like this method because I find it a bit cleaner.
OBLIGATORY DISCLAIMER: The above is a description of something that works for me. I accept no liability for what may occur if anyone else chooses to attempt it.
Victor springs can cut you up and Edison springs can break your fingers as well! I have not tried this method with an Edison spring.
I’ve used the method of spring installation described in ‘The Complete Talking Machine’ once and only once while installing the first of 2 springs into a Victrola VI barrel. After cleaning up the mess I immediately sought an alternative method and the following photos show what I did.
First, I suspended a bungee over my woodworking vise. The bungee is suspended from a rope tied to a pipe on one end and held by a steel eyelet on the other. That allows me to move the bungee perpendicular to the vise.
A heavy duty fishing swivel hangs from the bungee. From the swivel hangs a hook made of coat hanger wire. This hook holds the spring suspended over the vise.
The barrel sits on a piece of plywood with a hole drilled to receive the axle boss. A V-shaped piece of foam is on either side of the barrel to hold it in place without too much pressure.
With all of this in place I then grease the spring and barrel. At this point I hook the spring to the inside of the barrel and begin to load. As you feed the spring in, the swivel allows it to turn. As tension increases, the bungee stretches and as I approach the last few windings I pull down on the bungee to unhook the spring. The last few windings will almost fall into place.
We all have our preferred methods of doing things. My phono hobby is mostly a winter time activity so I work with springs in my basement. I like this method because I find it a bit cleaner.
OBLIGATORY DISCLAIMER: The above is a description of something that works for me. I accept no liability for what may occur if anyone else chooses to attempt it.
Victor springs can cut you up and Edison springs can break your fingers as well! I have not tried this method with an Edison spring.
-
Victrolaman
- Victor II
- Posts: 297
- Joined: Fri Jun 18, 2010 3:41 pm
Re: How to change and re grease springs
Bob this is a nice trick, that's for posting it, just goes to show you everyone has their own ways and tricks.
-
gramophoneshane
- Victor VI
- Posts: 3463
- Joined: Wed Jan 07, 2009 3:21 pm
Re: How to change and re grease springs
Here's another alternative method. Spring work starts around 5.20
[youtube]http://www.youtube.com/watch?v=9dhV4BjEShI[/youtube]
[youtube]http://www.youtube.com/watch?v=9dhV4BjEShI[/youtube]
-
Guest
Re: How to change and re grease springs
I might add that at our local flea market there is a vendor that sells thin pairs of cotton gloves (by the dozen) that are perfect to wear while removing and replacing springs. I've used these gloves every time and have never suffered a single cut. For further safety reasons, you should wear a long sleeved shirt or jacket and safety glasses just in case.
-
Victrolaman
- Victor II
- Posts: 297
- Joined: Fri Jun 18, 2010 3:41 pm
Re: How to change and re grease springs
Shane,
Thanks for posting the video, it was great.
Thanks for posting the video, it was great.