Ever since I've had my XVII, the finish has bothered me. The finish inside the lid looks brand new, shiny and deep, but the exterior is full and lightly alligatored in places, with a few shiny spots here and there where the finish wasn't affected. (Keep in mind, this photo makes it look worse than it is, because I've "zoomed in" a little). I've always wanted to do something about it, but I've been scared that I would ruin a good original finish on a 95 year old phonograph.
If the light isn't hitting it directly, it looks great, but when it does, it comes off looking dull. Is there a way to perhaps improve the finish without risking ruining it? I've tried steel wool and Go-jo, to no effect. It's been kept clean it's entire life, and had almost no grime accumulation when I got it.
Saving America's Acoustical History, One Phonograph At A Time...
John, could you post photos of a machine that you have used the re-amalgamation process to your satisfaction? I tried it early in my collecting career without success. Maybe I was too impatient or tried too large an area but I was not satisfied with the results. Thanks, Jerry
I've always had good luck with the method described here -- http://www.gracyk.com/restore.shtml -- though re-amalgamation, or what I've heard others call "French Polishing" will probably do a better job of matching the exterior to the interior. It all depends on how "new" you want it to look.
Keep in mind, the "wet sandpaper" method I mentioned WILL smooth out the alligatored spots, if properly done, but it does take some time. When I did this to my first Victrola, I worked on it, off and on, for about two weeks before I was satisfied.
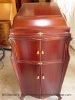
I always first use Kotton Kleanser or GoJo or GooP and 0000 steel wool as well. But after this process the finish always still looks quite dull, because the wood and finish are deeply dried out. The miracle stuff for me is the "Protective Wood Feeder" from Kotton Kleanser. You cover the whole wood finish with a thick layer and let it sit for 8-12 hours. Then wipe it off with a clean soft cloth and be amazed by the difference it makes. I would try that before trying re-amalgamation. Please see the before and after of my VV-IXa below.
Andreas
One does not actually "feed the wood". That is a very misleading statement that confuses the issue. Wood does not need to be "fed". The filled, stained, and sealed wood is under the finish, which may be varnish, lacquer, or shellac. These top coats contain volatile oils that make the finish elastic. Depending upon the formulation, these volatile oils are variously affected by changes in temperature, humidity. When the volatile oils leave, the finish draws up and becomes wrinkled, alligatored, and brittle. Some formulations seem to be more stable than others. Pathé Actuelles, for example, are almost always found 'wrinkled' up to some degree even if not exposed directly to a heat source such as direct sunlight or a chimney in an attic. The secret to amalgamation is to remove nearly all of the thickened areas of the finish down to just a thin layer of finish by dissolving or abrading or a combination of both, then removing much of the remaining thin non-wrinkled layer of finish the same way, then smoothing that layer and reapplying a new top finish on the thin layer of the old. One cannot reuse the old finish by just spreading the dissolved gunk around on the cabinet. The volatile oils have left this stuff eons ago and dissolving it with solvent would remove them as well, so there is no sense in using the old finish even if you could. I think this is where most people get frustrated with the process because of the perceived poor result at this stage. Once the entire finish has been 'melted' and spread around/removed from the cabinet so that the remaining finish is a smooth uniformly thin coat, then reapply a fresh finish on top and polish appropriately. Be careful solvent don't run onto areas you DON'T want to reamalgamate. Gravity can be your friend here. This is not a fast process. It is tedious.
Jerry, I don't have any photos to show you off the top of my head. We're on line-up for this fair today and won't be back to my computer for hours, but I'll check when I'm able.
"All of us have a place in history. Mine is clouds." Richard Brautigan
alang wrote:I always first use Kotton Kleanser or GoJo or GooP and 0000 steel wool as well. But after this process the finish always still looks quite dull, because the wood and finish are deeply dried out. The miracle stuff for me is the "Protective Wood Feeder" from Kotton Kleanser. You cover the whole wood finish with a thick layer and let it sit for 8-12 hours. Then wipe it off with a clean soft cloth and be amazed by the difference it makes. I would try that before trying re-amalgamation. Please see the before and after of my VV-IXa below.
Andreas
I have had some pretty good results in similar situations with Kotton Klenser, applied with 0000 steel wool (but not too vigorously), followed by the aforementioned "Protective Wood Feeder" or sometimes with even better results from following the cleaning by Howard's "Feed-N-Wax," a beeswax and orange oil mixture.
Clay
Arthur W. J. G. Ord-Hume's Laws of Collecting
1. Space will expand to accommodate an infinite number of possessions, regardless of their size.
2. Shortage of finance, however dire, will never prevent the acquisition of a desired object, however improbable its cost.
alang wrote:I always first use Kotton Kleanser or GoJo or GooP and 0000 steel wool as well. But after this process the finish always still looks quite dull, because the wood and finish are deeply dried out. The miracle stuff for me is the "Protective Wood Feeder" from Kotton Kleanser. You cover the whole wood finish with a thick layer and let it sit for 8-12 hours. Then wipe it off with a clean soft cloth and be amazed by the difference it makes. I would try that before trying re-amalgamation. Please see the before and after of my VV-IXa below.
Andreas
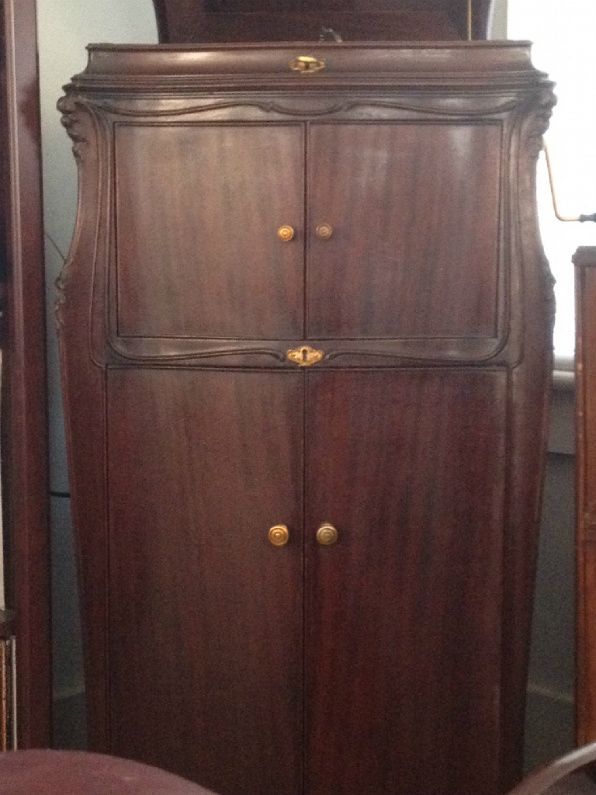
The problem I would have, is that (from your photos) while the wood feed has brightened up the appearance, the alligatoring still sticks out like a sore thumb. It no doubt improved it, but I want to (safely) remove or "blend" as many of the shellac cracks in my finish as I can, so when something like that is applied, you just see a deep, glossy finish, instead of highlighted alligatoring.
Tim Gracyk's process seems to be an OK one to try, but wouldn't 600 grit still "scratch" the overall surface? In other words, even when you stop sanding, you'll still see a crap-ton of little mini scratches all over the thing, wouldn't you? Rottenstone is mentioned, but the only place I can easily find online that has it is in the UK, and I've never used it before. Would it remove the fine scratches and leave a (relatively) reflective surface?
Saving America's Acoustical History, One Phonograph At A Time...
There's still a long way to go between 600 grit and rottenstone. I used to buy rottenstone at the local hardware store (before the advent of big box stores). Paint stores may be a source nowadays, or perhaps Woodcraft or Constantine's. One bag will last half a lifetime. It is the absolute final polish.
"All of us have a place in history. Mine is clouds." Richard Brautigan
![[The Talking Machine Forum - For All Antique Phonographs & Recordings]](/styles/we_universal/theme/images/the_talking_machine_forum.png)