![[The Talking Machine Forum - For All Antique Phonographs & Recordings]](/styles/we_universal/theme/images/the_talking_machine_forum.png)

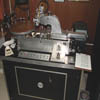
Here are some instructions for removing the motor and some other things. You can do it by yourself if necessary but it is helpful to have someone to help you hold the lid up to the maximum raised position. The whole process takes about two minutes, (much less than it takes to read my instructions) but it is very hard to describe. Hence my long narrative.
You probably know this already, but the reason that the motor needs to be removed is that the whole mechanism pivots off the right side of the case, (crank side). It is not bolted in like on the B and C series and if you lay it on it's back with the mechanism inside it will come loose. Even if under the lid is well packed, on a longer trip the mechansim moves through the packing and get to the horn neck and the inside of the lid. Even if you trasport it with the machine standing, it can cause problems, break feet off etcetera because it's so darn heavy.
Sorry for all the detailed instructions. I’m sure this is not the first machine you packed for shipment but just wanted to make sure you had all the advantage of my knowledge (and my past mistakes) to make sure this nice machine arrives without a scratch.
By the way, the owners manual pictured on the link you sent me might have some diagrams or pictures on how to install the mechanism that would also be helpful.
So here we go!
REMOVING THE MECHANISM:
- Once crank, turntable and reproducer are all removed, do the following.
- Lay some towels over the edges of the machine. Pull them down between the frame and the bedplate a bit. When you lift the mechanism out, it's very heavy and this can save paint or dent in the wood as you are trying to lift it out. The spring barrels, some of the gears and the winding shaft and corners of the bedplate are particularly prone to banging into sides of the case.
- Swing horn to the extreme right and raise up the mechanism so that you can put that operating handle horizontal and laying parallel to the front side of the case.
- Swing automatic break (on operating handle) around to extreme left so that it's parallel with the front of the case.
- Standing on the crank side of the machine, firmly grasp the bedplate with both hands, left hand fingers between frame and bedplate, right hand between frame and curved rail on back side of case, preferrably with someone holding lid up to maximum extent, (Don't grab onto curved rail)
- The bedplate pivots on the crank side, so start to pivot the bedplate up, far side should raise up when you lift
- The right back corner slides into a slot so you need to swing the bedplate up and twist it slightly to the left to move the peg out of the slot
- The left front corner peg on bedplate slides into a hole so as you slide out the right rear corner from the slot, you should be able to move the peg on left front side from the hole that it slides into. At that point the mechanism is free and becomes quite heavy.
- As you lift the bedplate up and out now, you need so move the whole thing out, away from your body so that the female end of the winding shaft on the motor will clear the frame. As you move the whole mechanism away from your body a bit, you need to be careful that the right rear corner of the bedplate does not hit the back corner of the lid, (this is where having a helper to hold the lid up comes in handy)
- Have something ready to lay the motor on ready, being careful not to let the sides of bedplate scratch on a hard surface.
PACKING THE MECHANISM:
The tricky part is over now but a few more suggestions.
- The mechanism needs to be put in some sort of box. Corners and sides of bedplate are particularly vulnerable to chafing so I like to first wrap with some cloth and then wrap bubble wrap around the whole thing. Reason is I have seen bubble wrap react with the paint on at least one occaision and leave marks.
- A few roles of paper towels underneath the corners of the wrapped bedplate can help stabilize it, keep it from rolling around.
- Packing peanuts etcetera around the whole works then so it’s “tight packed” cannot move around within the box.
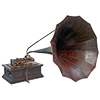
PACKING THE THE HORN & HORN COMPARTMENT:
The horn compartment also needs to be “tight packed” so nothing can move around.
- An old towel works well to wrap around the neck of the horn with some packing tape around to keep it secure.
- I’ve also covered the horn neck with a soft cloth, t-shirt or something and then slid a toilet paper or paper towel roll over the neck
- If you have any old pillows you don’t mind parting with, stuffing this area with them and laying a pillor over the top of the horn neck can work great
- Stuffing plastic shopping bags full of packing peanuts and then shoving them into that area also works well. Key is that it’s tight tight tight inside there and can’t rub against anything.
PACKING THE DRAWERS:
You already noted you that you would wrap something around the handles. You are right. They cannot be removed.
- Also, putting somehing, a thin piece of packing foam between drawers and where they rub against the frame of the cabinet helps keep them from chafing.
- Another thin piece between drawers and the door is also a good idea, especially if Brice hauls it upright.
OTHER:
- Thin piece of packing foam between lid and top of case is also good.
- Best not to lock the case. Locks can break apart from all the vibration
- Once you’ve wrapped the whole machine in something, wrap packing tape around from top to bottom front to back to keep the lid and doors closed
- Knurled feet are particularly vulnerable to damage. I would appreciate if you could well protect that bottom area
- Take casters out or secure them in the case, (so not rolling casters on cement, gravel etcetera
That’s about it. Again, sorry for all the detailed instructions.