![[The Talking Machine Forum - For All Antique Phonographs & Recordings]](/styles/we_universal/theme/images/the_talking_machine_forum.png)

Wow Very professional job. I and I am sure others would be honored to have one of your horns in our collection.
Bruce
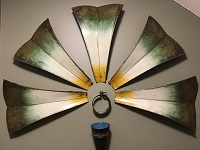
Wood Grained Cygnet Elbow
-
Bruce
- Victor III
- Posts: 578
- Joined: Mon Jan 02, 2012 9:15 pm
- Location: Vancouver, Canada
-
Discman

- Victor II
- Posts: 240
- Joined: Wed Jan 07, 2009 4:56 pm
- Contact:
Re: Wood Grained Cygnet Elbow
Thanks everyone for all of the compliments. I was without a suitable horn for my Triumph for a couple of months and it is nice to be able to listen to it again. The Music master horn sounds great too!
Dave
Dave
-
FloridaClay
- Victor VI
- Posts: 3708
- Joined: Wed Jan 26, 2011 7:14 pm
- Location: Merritt Island, FL
Re: Wood Grained Cygnet Elbow
Congratulations. Really excellent!
Clay
Clay
Arthur W. J. G. Ord-Hume's Laws of Collecting
1. Space will expand to accommodate an infinite number of possessions, regardless of their size.
2. Shortage of finance, however dire, will never prevent the acquisition of a desired object, however improbable its cost.
1. Space will expand to accommodate an infinite number of possessions, regardless of their size.
2. Shortage of finance, however dire, will never prevent the acquisition of a desired object, however improbable its cost.
-
fmblizz
- Victor IV
- Posts: 1212
- Joined: Tue Jan 12, 2010 4:59 pm
- Location: South Jersey
Re: Wood Grained Cygnet Elbow
Super super job. I'm sure you helped many restorers on this site with you valuable information and technique.
fmblizz
fmblizz
-
ambrola
- Victor IV
- Posts: 1502
- Joined: Sat Dec 29, 2012 11:20 am
- Personal Text: Be Careful What You Say, You Can't T ake It Back!
- Contact:
Re: Wood Grained Cygnet Elbow
Great job Dave. Did you ever figure out the problem with the horn sitting wrong?
-
Valecnik

- Victor VI
- Posts: 3874
- Joined: Sat Jan 10, 2009 3:28 pm
- Personal Text: Edison Records - Close your eyes and see if the artist does not actually seem to be before you.
- Location: Česká Republika
- Contact:
Re: Wood Grained Cygnet Elbow
You really did a good job. I've seen originals that were never done nearly that well. The quality of wood graining on those Edison elbows seemed to vary wildly. I've seen some really nice and others that looked pretty amateurish.
Nice work!
Nice work!
-
Phonolair
- Victor III
- Posts: 621
- Joined: Wed Jan 07, 2009 4:23 pm
- Location: Michigan
Re: Wood Grained Cygnet Elbow
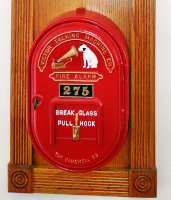
Fantastic job on the elbow Dave, and great description on how to do it ourselves . But I think you will need to get one of those red Take A Number stands to put by your front door. That way when we are lining up at your front door to get our elbows done everything will be calm and orderly.
Best Regards, Larry
Best Regards, Larry
-
Discman
- Victor II
- Posts: 240
- Joined: Wed Jan 07, 2009 4:56 pm
- Contact:
Re: Wood Grained Cygnet Elbow
Here's the whole process in more detail:
Choice of background color and glazes is dependent on color of wood being matched. The goal is to get the faux finish similar in color to what a piece of wood would look like before shellac is applied. If you get the faux color to match the finish of the wood, the final color will be too dark after shellac is applied. I applied 4 coats of orange shellac to get the final tone I needed. Each project will be different.
The base coat: Glidden "Aztec Gold" sold at Home Depot. This is wall paint and they can custom mix a small sample jar for under $4 which is more than enough to do several elbows.
The paints I used for the glazes are made by Plaid Enterprises and sold in Joann Fabric Stores, Walmart has some colors too but not as many as Joann’s. The bottle’s say “Folk Art” paint and are 2 oz in size. The Nutmeg color is #2925, Burnt Umber is #1618 and the black is called Licorice #938.
The base coat must be smooth; any brush strokes must run in the same direction as first glaze coat.
Drag first glaze coat (Nutmeg) with a chip brush to simulate underlying grain. You are making course brush strokes with this layer to simulate the underlying grain of the wood; they should smoothly follow the contours of the elbow. Once dry, these brush strokes will also be a guide to lay down the grain lines.
Hand the paint grain lines with a 80/20 mix of Burnt Umber and Black.
The Folk Art paints dry extremely fast and don’t provide enough working time to get the basic grain effect applied so I found that by lightly spraying the surface with a fine spray of water I could keep it workable for 5 minutes or so. Applying this layer in a smooth flowing pattern is critical. Keep paint moist and fluid by very lightly misting with water. The nice thing about these water based paints is that if you don’t get it right, just run it under some warm water before it dries, wash it off and start over.
After the glaze coats dried the faux color needed a little more red tone so I lightly wiped the whole thing down with Minwax gel stain (mahogany #605). Unfortunately, Minwax is an oil based product and it takes at least 48 hours to dry and may still feel tacky at this point.
Another trick I employed was using a visual guide to paint the grain lines. I did that by taking a close up picture of the grain on the horn, printed it and used it as a reference while I painted.
-
Moooperator
- Victor I
- Posts: 179
- Joined: Fri Jan 09, 2009 12:55 am
Re: Wood Grained Cygnet Elbow
one word.... WOW!
-
need4art
- Victor II
- Posts: 482
- Joined: Thu Jan 15, 2009 6:46 pm
- Personal Text: A man is not a man who does not make the world a better place
- Location: Arizona
Re: Wood Grained Cygnet Elbow
I do wood graining and gold leaf in my work and if you want to get the glaze to dry faster after you are done, give a light misting coat or two of Deft semi gloss. In 30 minutes or so it will be dry. Wait 2 hours and you can apply the shellac.
By the way I am trying my first shot at shooting shellac with a Fuji 3 stage HVLP system. Could you tell me what diameter of nozzle you use and pressure?
Thx Abe
By the way I am trying my first shot at shooting shellac with a Fuji 3 stage HVLP system. Could you tell me what diameter of nozzle you use and pressure?
Thx Abe