![[The Talking Machine Forum - For All Antique Phonographs & Recordings]](/styles/we_universal/theme/images/the_talking_machine_forum.png)

Hello, everyone! I'm quite new to this. Any help, advice, pep talks, etc. would be much appreciated!
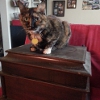
I just acquired a graphophone today. Based on my research, my best guess is a 1915 Grafonola. It was an impulsive purchase, and I knew going into it that it would be a challenging (but fun, hopefully!) project to restore, especially for a beginner. (Like I said... impulsive.) I'm tackling it a bit at a time, saving the mechanics for later until I have a better idea of what the hell I'm doing. Here are the first of what I'm sure will be a deluge of questions:
1) What is the best way to repair gouges and chips on the lid's edge? I've watched tutorials that recommend everything from epoxy putty sticks to auto body filler, and I want to make sure I don't damage the wood or make it impossible to match the stain.
2) What kind of shellac or coating, if any, was used for this model? The lid has seen better days, and I'm thinking of stripping it and starting fresh; I want to make sure that whatever I do next somewhat matches the rest of the piece.
3) I've read some very strong opinions on the subject of felt replacement... I'm going for it anyway. Any recommendations on what kind to use?
4) What is the best way to get paint specks off? Someone seems to have stored this beauty in the garage for an extended period of time.
Thanks, everyone!
Columbia Grafonola restoration
-
ciro7
- Victor Jr
- Posts: 7
- Joined: Sat Apr 13, 2013 5:26 pm
- Personal Text: Columbia Grafonola (1915?)
Columbia Grafonola restoration
- Attachments
-
- Obviously a "before" picture. It's still coated with grime, poor thing.
-
Curt A
- Victor Monarch Special
- Posts: 6892
- Joined: Fri Jul 09, 2010 8:32 pm
- Personal Text: Needle Tins are Addictive
- Location: Belmont, North Carolina
Re: Columbia Grafonola restoration
1. Gouges or chips: depends on the extent of the gouge or chip - closeup pics would help. If you use epoxy filler which is very strong, the drawback is that it is not able to accept stain once it is hardened. You can find epoxy filler in mahogany tones that would probably work. Otherwise, you need to find wood that matches your cabinet and cut or carve appropriate fill pieces or re-veneer.
2. Finish: Is this mahogany or oak? I am assuming Mahogany... In that case, once you strip the cabinet and repair the gouges or chips to your satisfaction, the "Furniture Doctor" makes mahogany aerosol "toner" in red or brown that has stain and lacquer finish in one application. The good thing about this is that it will cover repairs or fills, where stain will sometimes not take in the repaired area. Just spray additional coats 'til you get the look you want. Being aerosol, it is easy to apply and no brush strokes...
3. Felt: go to a fabric store and find the closest match to the original. Typically old felt will be more of a yellow/green tone while most modern felt is dark green. However, whatever you like will work.
4. Paint specks: if you want to remove paint specks only, Goof Off will soften them and take them off. However, If you intend to strip the lid, you might as well strip the whole cabinet, so it will match - that will get rid of the specks during stripping.
The "Furniture Doctor" link is: http://www.furnituredoctor.net/ a complete catalog is available for download: http://www.furnituredoctor.net/images/Catalog.pdf
This guy has everything you might need, from epoxy fillers in different colors, strippers, stains, toners and some hardware... Good luck on your project.
"The phonograph is not of any commercial value."
Thomas Alva Edison - Comment to his assistant, Samuel Insull.
"No one needs a Victrola XX, a Perfected Graphophone Type G, or whatever you call those noisy things."
My Wife
Thomas Alva Edison - Comment to his assistant, Samuel Insull.
"No one needs a Victrola XX, a Perfected Graphophone Type G, or whatever you call those noisy things."
My Wife
-
Curt A
- Victor Monarch Special
- Posts: 6892
- Joined: Fri Jul 09, 2010 8:32 pm
- Personal Text: Needle Tins are Addictive
- Location: Belmont, North Carolina
Re: Columbia Grafonola restoration
By the way, the "Furniture Doctor" is also a phonograph collector, so he will be able to assist you with more specific questions...
"The phonograph is not of any commercial value."
Thomas Alva Edison - Comment to his assistant, Samuel Insull.
"No one needs a Victrola XX, a Perfected Graphophone Type G, or whatever you call those noisy things."
My Wife
Thomas Alva Edison - Comment to his assistant, Samuel Insull.
"No one needs a Victrola XX, a Perfected Graphophone Type G, or whatever you call those noisy things."
My Wife
-
Jerry B.
- Victor Monarch Special
- Posts: 8764
- Joined: Tue Feb 10, 2009 11:25 am
- Personal Text: Stop for a visit when in Oregon.
- Location: Albany, Oregon
Re: Columbia Grafonola restoration
If that machine were mine I would:
Clean the cabinet. First, I would remove the turntable (lift straight up), remove the motor board with motor, remove the tone arm, and small hardware like the crank escutcheon. I've used Kotton Klenser and GoJo (the non-abbrasive type) with good results and apply gently with 0000 steel wool. I've had good results removing paint specks with Kotton Klenser. Have others had similar results with GoJo and paint specks? If you very gently disturb a paint speck with a tool, the Kotton Klenser will be quicker about removing the paint speck. For the tool I used an old dental tool shaped like a tiny spoon. I've also used the curved edge (not sharp) of a putty knife or a well work screw driver. I clean one section of a cabinet at a time. For example, I clean one side of the lid and work my way around the lid and finish with the top. It doesn't matter where you start but be patient. Once you cabinet is clean, you can assess what repairs, if any, need to be made. If your missing veneer is minor you may just want to stain the flaws.
Turntable felt... It's really easy to replace felt on a turntable with a sharp 90 degree edge. I just glue it down and trim with a wet stone. It looks perfect every time. Your Grafonola has a turntable with a rounded edge is much more difficult unless you can cut a perfect circle. It has to be perfect because once it starts spinning, the imperfections become more apparent. I bought some aluminum stock about ¾" wide, ⅛" thick, and cut a piece 8" long. In one end I drilled a hole that exactly fits the spindle. Slip the piece over the spindle and make a mark where you want the felt to end. Next, cut a grove where you've made a mark and use that as a guide to trim your already glued felt.
Your tone arm is made from pot metal that tends to swell with age. The tone arm should move freely both vertically and horizontally. If it does not, you need to repair the tone arm. There are other threads addressing this issue.
I hope this helps, Jerry Blais
-
ciro7
- Victor Jr
- Posts: 7
- Joined: Sat Apr 13, 2013 5:26 pm
- Personal Text: Columbia Grafonola (1915?)
Re: Columbia Grafonola restoration
I got most of the grime off yesterday; here's some pictures of the finish - and the damaged bits - after the first round with Old English this morning.
- Attachments
-
- The top of the lid. I'm guessing someone stored a paint can on it, hence the ring, but I don't know how to explain the texture.
-
- A wider view of the top of the lid.
-
- Damage on the inside of the lid.
-
- Damage to the outside of the lid.
-
- Chip at the back of the lid.
-
- Some minor stuff.
-
ciro7
- Victor Jr
- Posts: 7
- Joined: Sat Apr 13, 2013 5:26 pm
- Personal Text: Columbia Grafonola (1915?)
Re: Columbia Grafonola restoration
I read that one of the changes they made to the 1915 model was switching from pot metal to chrome. Hopefully this is the case with mine, since it sounds like a major bullet to have dodged!Jerry B. wrote: Your tone arm is made from pot metal that tends to swell with age.
-
Lucius1958

- Victor Monarch
- Posts: 4108
- Joined: Tue Dec 14, 2010 12:17 am
- Personal Text: 'Don't take Life so serious, son. It ain't nohow permanent.' - 'POGO'
- Location: Where there's "hamburger ALL OVER the highway"...
Re: Columbia Grafonola restoration
Where did you read this?ciro7 wrote:I read that one of the changes they made to the 1915 model was switching from pot metal to chrome. Hopefully this is the case with mine, since it sounds like a major bullet to have dodged!Jerry B. wrote: Your tone arm is made from pot metal that tends to swell with age.
As for the finish: if it's shellac, you might be able to re-amalgamate the 'alligatored' areas with alcohol... or at least remove enough of the surface finish to smooth it out by adding new coats (which gives a good appearance without completely stripping it)...
Bill
-
ciro7
- Victor Jr
- Posts: 7
- Joined: Sat Apr 13, 2013 5:26 pm
- Personal Text: Columbia Grafonola (1915?)
Re: Columbia Grafonola restoration
http://forum.talkingmachine.info/viewto ... f=2&t=6550 and http://www.radio-antiks.com/IndexRadio- ... ola_50.htmLucius1958 wrote:Where did you read this?ciro7 wrote:I read that one of the changes they made to the 1915 model was switching from pot metal to chrome. Hopefully this is the case with mine, since it sounds like a major bullet to have dodged!Jerry B. wrote: Your tone arm is made from pot metal that tends to swell with age.
I'll pick up some denatured alcohol tomorrow. What's the best method of applying it?
-
martinola
- Victor III
- Posts: 964
- Joined: Wed Feb 11, 2009 1:30 pm
Re: Columbia Grafonola restoration
Hi ciro7!
That's a cute machine with original finish that would well be worth saving. Before you start your re-amalgamation, you'll want to get all of the wax and oil off of the surface by wiping it down with paint thinner, then you'll to fill the missing bits with filler. If you can find one that already has a slightly reddish tone all the better. (Auto-body filler Bondo might work well on along the mashed edge of the case.) Once the filler is dried and sanded (just a little bit to smooth the rough edges, you may want to take an exacto knife and notch in some fake grain. Very lightly, just enough to hold a little extra stain. When re-amalgamating it is sometimes possible to "pull" some of the original color over the patched areas. This won't be perfect, but it is a good starting point. The over-all finish may look better at that point or it may look worse, but don't worry, you'll make it look better later.
For matching color, a small artist's brush will be useful. Having some dark mahagony aniline powder stain to mix in with a bit of shellac to cover specific areas will help you a lot. (Careful, a teeny, tiny bit will be all you need - it's very concentrated.) As has been mentioned in other threads, you may want to use some colorant with a slight bit of yellow as well - perhaps a few coats of amber shellac will do this. (Heck, even Sharpies can help you in coloring small areas.) You'll be building the color mostly on top of the finish, rather than in the filler itself. As the color on the patches approaches the color of the rest of the case, you'll want to over-coat the rest of the case with new shellac. For these first coats, I'd use clear shellac, or a mixture of clear with a little amber shellac. You can still touch-up specific areas with color if need be between coats. You'll probably want to do about 5 or 6 thin coats with light sanding between. Don't be in too much of a rush as you'll need the shellac to harden-up between coats. IOW: take a 4-5 day break every now and then in the process. You'll then want to do a final sanding with 600 grit wet/dry sandpaper, a final polish with rotten stone (or white autobody polish) and wax.
Here are some other threads that touch on this process somewhat:
http://forum.talkingmachine.info/viewto ... =2&t=11685
http://forum.talkingmachine.info/viewto ... =7&t=11774
http://forum.talkingmachine.info/viewto ... 313#p48313
The main thing is to take your time during the process. Best of luck and please keep us posted of your progress!
Martin
-
alang

- VTLA
- Posts: 3116
- Joined: Thu Aug 19, 2010 9:36 am
- Personal Text: TMF Moderator
- Location: Delaware
Re: Columbia Grafonola restoration
I have several Columbia Grafonolas and I can tell you for sure that this is incorrect. First of all, chrome plate would only be the finish, but it was not used until the 1930s on portable machines. Until then metal parts were usually nickel plated. Early Columbia tonearms were made from brass and then nickel plated, then at some point between 1910 and 1915 they started making the toneams and elbows from pot metal, also nickel plated. All my Grafonolas from the late teens to the mid 1920s have pot metal tonearms, tonearm bases and elbows. Depending on how they were stored they swell more or less. If it moves freely you are lucky. If not it should be repared.ciro7 wrote:I read that one of the changes they made to the 1915 model was switching from pot metal to chrome. Hopefully this is the case with mine, since it sounds like a major bullet to have dodged!Jerry B. wrote: Your tone arm is made from pot metal that tends to swell with age.
Good luck
Andreas