Cardinal Phonograph Restoration Project (Need Advice)

Discussions on Talking Machines & Accessories
User avatar
SignatureSeriesOwner
Victor II
Posts: 335
Joined: Tue Feb 23, 2010 9:35 pm
Personal Text: VV-XVII, VV-XVI, VV-107, VV-IX's....
Location: Surry, VA

Cardinal Phonograph Restoration Project (Need Advice)

Post by SignatureSeriesOwner »

Well, I bought this sucker for $25 at an Ruritan Sale locally, and it sure didn't look like much for the money.

Image


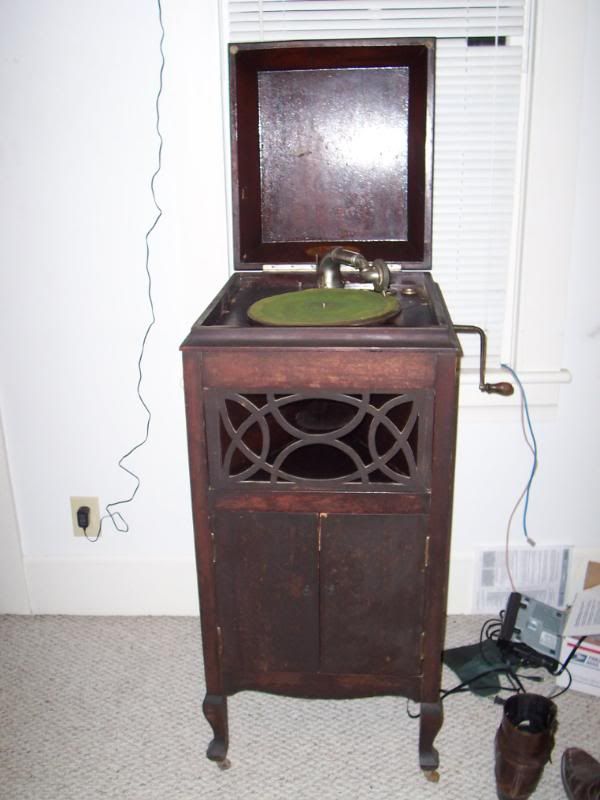
The horn was in pieces at the bottom of it (well, on top of the shelves,) the motor didn't run, the tone arm has been snapped off of it's base (no way I can see repairing that!) all the nickel plating is in fairly bad shape, and the finish looks....well, the photo says it all.


About a week ago, I got tired of looking at my shiny, mint VV-XVII, only to glance over at this and cringe. So, I decided to begin stripping the original shellac finish. Luckily, someone already decided to take care of the very top of the lid for me, who knows when. :D

So, I went to the local hardware store, bought 4 cans of Denatured Alcohol, and went to work.

At first, for things like the lid, the feet, and the side posts, I would just saturate a rag, and keep wiping with the grain until it was smooth, and no traces of the original finish remained. The sides, didn't work very well with that approach, so I tried something new.

I set the entire machine on it's side on an old table, and just poured the Denatured Alcohol on the side of it (mistake?) I made sure all of the finish was submerged, and let it sit for a minute. Then, wiped it all off. Two coats per side, and the finish was 100% removed. 8-)

I removed the motorboard and tone arm support board(?) from the interior, and removed all the accessories on top.

Image
Image
Image

I then soaked the piece, just as I did the sides, and wiped the finish away in 2 applications. Normally, I try to save the finish whenever possible, but it was just not possible (in my eyes) in this case. As in most places, it was very thin, gone, or very alligatored and chipping. Plus, all the finish on the inside was very "puffy" and sticky as well.

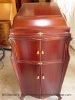
So, at this point, all I have left to refinish, is the inside "walls" that have a lot of finish damage on them, and, the inside of the lid (saving the label) Of course, I would normally leave it alone, but that is nearly just as bad as the outside of the cabinet, unfortunately.


So, here is where I am now. A little before and after.

Image ImageImage
Currently:

ImageImageImage

Still have a little touching up to do in a few little places, but, that's the outsdie of it at the moment. I don't know what happened to that one door, I suppose the Denatured Alcohol could have done it, but I would think it would have affected the rest of the wood, or at least the other door, in the same way. Perhaps not.


Now. What is the best method for re-finishing it? Just plain old Minwax wood finish and a brush, or a better approach? I'm no expert....in fact, this is my first true refinish. What would make it look best, and have a glossy, original finish? What have you guys used when you've been in this situation?


I don't even know what type of finish would look best, honestly.


I do think, it looks much better now, than it did, don't you all agree? :D


Thanks!
Saving America's Acoustical History, One Phonograph At A Time...

martinola
Victor III
Posts: 961
Joined: Wed Feb 11, 2009 1:30 pm

Re: Cardinal Phonograph Restoration Project (Need Advice)

Post by martinola »

Hi SignatureSeriesOwner.

I'm rather partial to Shellac. I had stayed away from it hearing from others that it is difficult to work with, but after braving it, will never go back to modern "varnish" (at least for antique phonographs). Most of the Edison machines were shellac finishes. Even varnished finishes of the period used shellac for the first sealing coats. Except for some special formulas most shellacs contain some wax and are therefore not appropriate for use under polyurethane. (Polyurethane is really more appropriate for bar tops, anyway.) I buy it in the can and build up the finish in thin coats using a pad of cheesecloth (or paper towels). I finish sand about every second coat. Re-coat time is about an hour so it goes rather fast.

It comes in orange(amber) and clear. I alternate between the two to adjust color and finish the top with about 3 coats of clear on the top. You do need to let it set a week or so (more in low temps) to harden up for final sanding & polishing. You shouldn't set anything on the finish (like a flower pot) for a couple of months until it really hardens. It is reversible. It can be thinned or removed with alcohol. Judging by the other finish being so readily stripped by alcohol, I'd bet that was the original finish.

OK; I've done my song & dance for shellac. Are there any tung oil fans out there that want to take a turn? :mrgreen:

Good luck with what ever you decide to do.

Martin

larryh
Victor IV
Posts: 1601
Joined: Wed Jan 07, 2009 7:44 pm

Re: Cardinal Phonograph Restoration Project (Need Advice)

Post by larryh »

Not a tung oil fan. I did a piano with it many years ago and it looked good at first and it was down hill from there.

Shellac is my choice too for early machines. The current project I am working on is a late edison which is lacquer.

Shellac take some practice and still can have some surprises when you work with it. I use the suggested approach of thinning it l part shellac to about three parts denatured alcohol. That way when spread with a good bristle brush on a level surface you can quickly get it carefully applied. I start at one side of a section and start the wet brush away from the edges or step ups so that it won't get too heavy and cause ridges or runs, then I quickly go the length of the piece repeating with coats till I am finished with that side. After it dries for half hour or so you can lightly sand a high spot out if you have to. It will take numerous of these very thin coats but its the best way to get a good build up without the hazards of heavily streaked finish which can happen if its too thick and quickly drying. After about 6 to 8 coats I let it dry and then rub it down with rottenstone and oil applied with a felt pad. I have purchased felt pads, but I picked up early on that buying an old mens felt hat would work, so I have a few pieces of old hats to use for rubbing down the final finish. After that you have to clean it up with mineral spirits (I think), and when its dry wax it well.

User avatar
Brad
Victor III
Posts: 939
Joined: Thu Jan 08, 2009 7:12 pm
Personal Text: So many phonographs, so little money
Location: The Garden State

Re: Cardinal Phonograph Restoration Project (Need Advice)

Post by Brad »

I agree with Martinola (aka Simon-bar-Sinister :D ) wrt shellac. Before you add finish, I would go over the cabinet again with alcohol and 0000 steel wool to smooth the finish. You could have done this as part of the removal process.

I would stay with original finishes. If shellac was there, use it again. I also was scared of shellac until I started using it. I found that wiping in on with a saturated rolled up square of old tee-shirt material worked well. I keep a squirt bottle (i.e. a ketchup) bottle in one hand, the rag in the other and keep squirting shellac onto the rag and wiping on. The good news is if you screw it up, just remove it with alcohol and start over (I have not had to do this). There are several colors of shellac available with Clear (blonde), amber (orange) and garnet (reddish) being the most common. You should be able to determine what color was used by the color absorbed in the rags you used to remove (there will be dirt and possible residues from colored waxes/oils used over the years). Shellac has natural waxes so you will not have an easy time of covering it with anything (i.e. poly) other than a coat of wax (again, don't poly, stick with the original finish).

You can buy shellac flakes online and make your own (mix flakes with alcohol, and let set a few days). Zinzer sells clear and amber shellac in most home improvement stores. The amber has a very nice orange color and that is what I have used. I cut it with alcohol in the squirt bottle at about a 3 to 1 ratio (¾ shellac, ¼ alcohol). I put on 2 coats, then when dry, go over it lightly with 0000 steel wool. I then will do 1 or 2 more coats. If 2 more, I repeat the steel wool after coat 3. When all is dry, I wax the cabinet.

I would start from the top of the cabinet and work you way down. Any drips or runs should be wiped off as soon as they happen otherwise they will be thicker than the overall finish and will show. If you are nervous, start with the back side of the cabinet.

Final recommendation is to go to Home Cheapo and buy a box of 100 blue nitrile gloves. Shellac is very sticky and you will go through many pairs of gloves on a job such as this.

Go for it!! You will be pleased with the results.
Why do we need signatures when we are on a first avatar basis?

User avatar
SignatureSeriesOwner
Victor II
Posts: 335
Joined: Tue Feb 23, 2010 9:35 pm
Personal Text: VV-XVII, VV-XVI, VV-107, VV-IX's....
Location: Surry, VA

Re: Cardinal Phonograph Restoration Project (Need Advice)

Post by SignatureSeriesOwner »

Alrighty, so shellac it is :D


What's the best way to apply it? Do those foam applicator "brushes" work well in a situation like this?


I read on Paul's website (Victor-Victrola.com) about how he refinishes Victrolas, and, for something like this, that seems way too involved, but the mirror finish sounds nice. :)


Would it still look decent if it was merely smoother out with steel wool (as mentioned above) and then shellac was applied? I'm sure anything would look better than it does now. Any shine is better than none ;)

Any specific brand of Shellac better than another, or just go for something that has a decent price?
Saving America's Acoustical History, One Phonograph At A Time...

larryh
Victor IV
Posts: 1601
Joined: Wed Jan 07, 2009 7:44 pm

Re: Cardinal Phonograph Restoration Project (Need Advice)

Post by larryh »

I buy shellac in quart cans, be sure to check the date on the can as it goes bad after a while, should have an expiration date on the can somewhere.

I don't think the foam brushes would work for shellac since you clean it with alcohol but I could be wrong. I have personally not perfected the rag routine, I usually ended up with smeary looking surfaces. I know that many use it but for myself the 3 alcohol to one part shellac and a good, not cheap real bristle brush works the best. Just be sure the brush is full but not so much it drips or causes flooding of the surface, you want it to spread evenly but not too thickly. That is the advantage to cutting it. You have to watch where you overlap and when you get to places where it could run you have to use some sense as to how to proceed. Don't start a full brush in a corner or up against a area where the raised panel is or it will be too thick and run, you can't work it over and over either as it starts to set as soon as its applied. You need to try it on something that isn't going to be used to be sure you know what your doing.
I always take some 200 or so grit paper and carefully sand down a surface if its rough. It will make a lot of difference in the way it comes out. You can also melt the shellac by using straight alcohol but again if your not used to doing that it could turn out worse than just sanding it. Read the advice on the net for restoring shellac finishes before you get going at it. Otherwise shellac can be a nightmare..

gramophoneshane
Victor VI
Posts: 3463
Joined: Wed Jan 07, 2009 3:21 pm

Re: Cardinal Phonograph Restoration Project (Need Advice)

Post by gramophoneshane »

Personally, I prefer to buy flake shellac & alcohol, and mix it myself. The flakes have a much longer shelf life than the pre-mixed stuff.
I've also found the best way to apply shellac is by using the fleesy lined fabric that sweat shirts & track pants are made of.
I know that probably sounds weird, but I started using shellac about 30 yrs ago with all sorts of brushes & store bought applicators, and 15 yrs ago I tried this & have never looked back.
Not only do you avoid any brush marks, but the shellac is distributed evenly & smoothly.

1. Cut a piece of material about 4" square.
2. Fold 2 raw edges to meet in the middle (fluffy side in) see pic 1.
3. Fold in half the opposite way. See pic 2.
4. Hold fabric at raw edge with your thumb & little finger on one side & the remaining 3 fingers on the other side for support. See pic 3.
5. Dip fabric in shellac (about ⅓ of it's length)and apply shellac. See pic 4.

The trick with shellac is you've got to work fast, no matter how you apply it (except perhaps spray painting).
You need to overlap each pass before the shellac dries, otherwise they wont flow into each other and a ledge will appear on the surface.
Give it ago, but just have a quick practise on a scrap of timber first to get a feel for it.
It's cheap & easy, and you dont have to worry about cleaning brushes afterwards. As long as the shellac doesn't dry out on the rag, it can be used many times, and if it does, you just throw it away & cut another one.
I usually apply 2 coats to start with, and once it's dry (about 20 mins) give it a light rub down with fine steel wool apply the next coat & rub down after each coat from then on.
Attachments
shellac rag 006.JPG
shellac rag 008.JPG
shellac rag 010.JPG
shellac rag 012.JPG

User avatar
SignatureSeriesOwner
Victor II
Posts: 335
Joined: Tue Feb 23, 2010 9:35 pm
Personal Text: VV-XVII, VV-XVI, VV-107, VV-IX's....
Location: Surry, VA

Re: Cardinal Phonograph Restoration Project (Need Advice)

Post by SignatureSeriesOwner »

Okay guys, I'm in a bit of a rut here. Went to Lowe's today, and they have a VERY small supply of Shellac.

Image


That's what they had, plus Clear.


Now, I'm thinking, since the finish on the machine is is reddish, Mahogany tinted shellac would look best correct?


I'm also looking for a high gloss shellac (is there such a thing?)


Anyone have a specific type/brand they like?


Shane, thank you for the fabric tip, I'll def. try that. I'd like to avoid the flakes for this one. Just because, I'd like to know I already have a good even mixture with no particles in it.


Would the clear one have worked as well? I didn't know there were so many options :?

I would like it to have a high gloss finish, however. I could *live* with a semi-gloss, but since this is a Phonograph that isn't well known, and probably isn't worth much, I figure, no point trying to kill myself trying to make the finish look as close to "how it would have looked now" if you know what I mean.
Saving America's Acoustical History, One Phonograph At A Time...

Edisone
Victor IV
Posts: 1140
Joined: Sat Aug 01, 2009 5:17 pm
Location: Can see Canada from Attic Window

Re: Cardinal Phonograph Restoration Project (Need Advice)

Post by Edisone »

Shane describes a version of French Polishing, actually. Try looking up more info - there's a LOT of it out there! Here's one link: http://woodworking.about.com/od/finishi ... ishing.htm

ps - Zinsser is dandy stuff

martinola
Victor III
Posts: 961
Joined: Wed Feb 11, 2009 1:30 pm

Re: Cardinal Phonograph Restoration Project (Need Advice)

Post by martinola »

The shine of shellac really depends on the the way you treat the finish after it's on. It dries to a very glossy shine. If you want that shine to be real shiny, like a piano, then you must build up a very smooth surface with many coats and much fine (300-400 grit) sanding between. After that, the finish is polished much like you would do when finishing a paint job on a car. In your case, instead of using auto body polish, you'll want to use rottenstone. (Actually, the last three finishes I did, I used regular white autobody polish, which worked fine for me.) My advice to you is not to go too crazy in looking for the piano finish as it's a huge pain, and I doubt the original finish was a super smooth piano type.

I think you picked well in getting the amber shellac as it will add a bit of color back to the cabinet that my have been lost during stripping. If you think it's getting too amber, you can always do your top finish coats in clear. As others have said, read up on it and then have a go. You'll get the hang of it. Keep us posted.
Martin

Post Reply