![[The Talking Machine Forum - For All Antique Phonographs & Recordings]](/styles/we_universal/theme/images/the_talking_machine_forum.png)

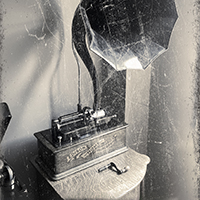
I am hoping to finish the restoration of my Edison home soon, and I wanted to ask about other people’s experiences with putting new decals on the cabinet. I bought mine off phonodecal.com. I didn’t realize I needed the two spray bottles, and I am wondering if the microset and microsol solution are necessary? Also how do you center the decal?
Do I need to restain the cabinet? Are shellac flakes better than shellac in a can?
I have a few more spots to finish stripping, but it’s very close to being ready
Any ideas how to fix the motor frame?
Thanks y’all!
Putting a new decal on an Edison home
-
dzavracky
- Victor IV
- Posts: 1623
- Joined: Fri Oct 25, 2019 11:37 pm
- Location: Washington DC
Putting a new decal on an Edison home
- Attachments
-
-
-
-
Curt A
- Victor Monarch Special
- Posts: 6892
- Joined: Fri Jul 09, 2010 8:32 pm
- Personal Text: Needle Tins are Addictive
- Location: Belmont, North Carolina
Re: Putting a new decal on an Edison home
First for finish on your cabinet, use Bullseye orange (amber) shellac. I have had good luck with applying it from the can with a clean, lint free cloth (like a piece of a tee shirt). If you try brushing it on your results will vary, leaving brush marks, thick spots, etc. It's important to get good coverage the first time over - you can't go back over the area you already covered, without causing problems, since the finish dries rapidly. In looking at your pictures, the main cabinet looks like a great color, so don't strip it... Clean it good and you can apply the shellac in a thin coat over what you have. Once the finish dries, if it looks too shiny, go over it with #0000 steel wool and it will take off the gloss...
Bullseye Amber does not come in a spray can that I am aware of. Mixing shellac flakes with alcohol is not a newbie type of thing and is more trouble than using shellac from a can.
The frame around the motor can be repaired (if you are a good woodworker) but the damage is in an obviously visible place, so you might be better trying to find a replacement. If you are going to the show in Charlotte, Charles McCarn or Bill Beam might have one. Otherwise put a want ad on the Forum.
Second, your decals came from Gregg Cline and are excellent, but thinner than those commercial types used on model cars, so use his instructions and both of the microset and microsol solutions. They are necessary to be able to have control over the application process before the decal dries... Be sure the shellac finish is done previous to applying the decal and wait 24 hrs for the shellac to dry. To center your decal, do not remove it from the backing, place the end of the decal (with the paper attached) in the correct location and slide it off to start it a bit at a time, carefully moving the paper backing along the desired path (the paper gives the decal support while the decal is slid off a little at a time). Be sure to use the Microset and Microsol per the instructions... Hopefully this makes sense, if not, call or email Gregg for specific answers.
Once the decal is dry, over coat it with amber shellac and it will blend into the finish...
"The phonograph is not of any commercial value."
Thomas Alva Edison - Comment to his assistant, Samuel Insull.
"No one needs a Victrola XX, a Perfected Graphophone Type G, or whatever you call those noisy things."
My Wife
Thomas Alva Edison - Comment to his assistant, Samuel Insull.
"No one needs a Victrola XX, a Perfected Graphophone Type G, or whatever you call those noisy things."
My Wife
-
dzavracky
- Victor IV
- Posts: 1623
- Joined: Fri Oct 25, 2019 11:37 pm
- Location: Washington DC
Re: Putting a new decal on an Edison home
Thanks for such a great answer! I think I went over the cabinet again after I took that picture..... I’ll attach another picture. I believe the color is lighter now. Do you ever use grain filler?
I already have a can of that shellac at my house.... so that works out well!
I plan on refinishin my Edison Standard as well, so at least I’ll get more than one use out of the solution!
Thanks for your reply!
P.S. is there a way to strip over an Edison decal without ruining it? (The Edison Standard case looks worse in person)
- Attachments
-
-
-
Raphael

- Victor IV
- Posts: 1601
- Joined: Sat Jul 14, 2012 9:44 am
- Location: Davie, FL
- Contact:
Re: Putting a new decal on an Edison home
dzavracky wrote:
P.S. is there a way to strip over an Edison decal without ruining it? (The Edison Standard case looks worse in person)
Recently I wanted to replace a large Concert decal and asked Gregg for advice when I purchased the replacement. He recommended that I apply the new decal right over the old one. Sounded a bit whacky, but I figured what the heck, all I can lose is the price of one decal, so I gave it a try. The results were spectacular.
Raphael
- Attachments
-
- 1.JPG (112.21 KiB) Viewed 1240 times
-
- 2.JPG (108.53 KiB) Viewed 1240 times
-
dzavracky
- Victor IV
- Posts: 1623
- Joined: Fri Oct 25, 2019 11:37 pm
- Location: Washington DC
Re: Putting a new decal on an Edison home
Hey that looks great. What if my situation is reversed tho? The cabinet looks terrible but the decal is great
-
Raphael
- Victor IV
- Posts: 1601
- Joined: Sat Jul 14, 2012 9:44 am
- Location: Davie, FL
- Contact:
Re: Putting a new decal on an Edison home
That's your decision, what to do with the cabinet. If you need to strip it and refinish, my quick solution doesn't work.
Raphael
Raphael
-
Curt A
- Victor Monarch Special
- Posts: 6892
- Joined: Fri Jul 09, 2010 8:32 pm
- Personal Text: Needle Tins are Addictive
- Location: Belmont, North Carolina
Re: Putting a new decal on an Edison home
"Do you ever use grain filler?" I don't but that's just me... unless you strip the finish completely, you probably don't need to use it.
As far as "stripping over a decal", it won't work. The decal will come off with stripper and you will need a new one, original decals in good condition are desirable. Stripping around the decal looks like cr@p. If the decal is good, and the finish is ok, clean it as good as possible and then over-coat the old finish with new shellac to rejuvenate it... it's not always necessary to strip the old finish.
As far as "stripping over a decal", it won't work. The decal will come off with stripper and you will need a new one, original decals in good condition are desirable. Stripping around the decal looks like cr@p. If the decal is good, and the finish is ok, clean it as good as possible and then over-coat the old finish with new shellac to rejuvenate it... it's not always necessary to strip the old finish.
"The phonograph is not of any commercial value."
Thomas Alva Edison - Comment to his assistant, Samuel Insull.
"No one needs a Victrola XX, a Perfected Graphophone Type G, or whatever you call those noisy things."
My Wife
Thomas Alva Edison - Comment to his assistant, Samuel Insull.
"No one needs a Victrola XX, a Perfected Graphophone Type G, or whatever you call those noisy things."
My Wife
-
dzavracky
- Victor IV
- Posts: 1623
- Joined: Fri Oct 25, 2019 11:37 pm
- Location: Washington DC
Re: Putting a new decal on an Edison home
Here’s some pics of the home. Does it need stain/grain filler?
Would you refinish the standard? The finish looks better on camera than in person
Would you refinish the standard? The finish looks better on camera than in person
- Attachments
-
-
-
-
VanEpsFan1914
- Victor VI
- Posts: 3400
- Joined: Fri Oct 06, 2017 11:39 am
- Personal Text: I've got both kinds of music--classical & rag-time.
- Location: South Carolina
Re: Putting a new decal on an Edison home
Regarding the Home, I told you what I do for filler--I sand a shellac finish and then finish it a few more time sanding between coats. Take some mineral spirits (NOT mineral oil) and put it on a rag and then wipe the case. That will give you an idea what color it will be with some finish. Then decide from there if it needs stain to be the right color for a 1908 Home.
-
JerryVan
- Victor Monarch Special
- Posts: 6819
- Joined: Mon Aug 24, 2009 3:08 pm
- Location: Southeast MI
Re: Putting a new decal on an Edison home
I would apply a coat of stain. It will even out the finish and give it the darker hue that it needs. Grain filler might be nice but isn't essential. In my opinion, stain IS essential here.