Recently restored an Edison Fireside A (B reproducer conversion). The previous owner had finished the case in wipe-on polyurethane and used decals that were inaccurate. You could tell it was an old restoration job from across the room.
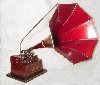
I completely stripped the case down to bare wood, stained it using aniline powder dye, pore-filled with aqua-coat, and finished off with a coat of sanding sealer, followed by 4 coats of amber shellac, and a new Greg Cline script decal. The oak on this was exceptionally "grainy" so it took a few tries to get a surface smooth enough for the decal.
The bedplate needed to be re-done as well. I lightly sanded off the old reproduction decals. The corner decals were very thick, and had a "sticker" like appearance. The pinstriping, while well done, was the wrong shade of blue, and Firesides originally used decals for the blue/gold pinstriping. I replaced everything with Greg Cline's fireside set. This was my first time applying pinstripe decals to a bedplate, so lots of trial and error. Thankfully I had two sets. Pinstripe decals, as I've found out, are best applied by soaking them in place with a cotton swab and gently pulling them into position.
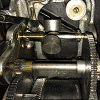
Then came the motor tear down. The spring seemed to be in good condition with no thumping or noise or excessive hardened grease, so I left it alone. The gears needed to be cleaned however, and the belt tensioner had to be freed up. All the bearings were cleaned out and re-oiled, and the belt tensioner could spin again, albeit with a small bright spot buffed by years of a sliding belt
Every project seems to have its weak point, and shellacking the bedplate was that point for this project. I used a few coats of spray shellac, which gave horrible orange peeling that I was too afraid to wet-sand out of fear I'd sand into the decals. I opted to try and re-flow the shellac with denatured alcohol, but it did not react nicely and left streaks. Further attempts started to eat away at the decal's color, so I padded some shellac over them to protect from further abuse, and buffed everything out gently. In hindsight, I should've padded on the shellac from the start, but the results are otherwise acceptable enough to display.
Fireside Restoration
-
- Victor Monarch Special
- Posts: 6588
- Joined: Mon Aug 24, 2009 3:08 pm
- Location: Southeast MI
Re: Fireside Restoration
Nice work!!
-
- Victor Monarch Special
- Posts: 8730
- Joined: Tue Feb 10, 2009 11:25 am
- Personal Text: Stop for a visit when in Oregon.
- Location: Albany, Oregon
Re: Fireside Restoration
Outstanding effort!
Jerry B.,
Jerry B.,
- alang
- VTLA
- Posts: 3116
- Joined: Thu Aug 19, 2010 9:36 am
- Personal Text: TMF Moderator
- Location: Delaware
Re: Fireside Restoration
Looks great!
Andreas
Andreas
- ChuckA
- Victor III
- Posts: 602
- Joined: Thu Jan 15, 2009 6:32 pm
- Personal Text: Learn from the mistakes of others - You can't live long enough to make them all yourself.
- Location: South Eastern PA
- Contact:
Re: Fireside Restoration
Your work looks very good, but I would make two recommendations when applying decals.
First is to use MicroSol or MicroSet to soften the backing film, it will help adhere the decal to your work and let it form over any rough places.
Second is to make the film edges disappear by applying multiple medium coats of shellac to the dry decal and lightly
sanding off the shellac covering the decal. Reapply more shellac and sand down again, keep doing that until the decal
blends into the work. I use 400 to 1000 grit paper until the final finish, if you don't like the gold look use amber shellac for the last couple of
layers and finally use plastic polish to polish out the fine sandpaper scratches.
Here is a Spring Motor I restored, took a few weeks of spraying and sanding, probably 15 coats and I left it gold colored instead of dulled.
A restored early Suitcase Home:
Chuck
- Governor Flyball
- Victor II
- Posts: 311
- Joined: Thu Nov 26, 2015 8:59 pm
- Location: Waterloo, Ontario, Canada
Re: Fireside Restoration
Very nice. I have a Fireside that was polyurethanes in the past that needs to be redone.
Yours looks terrific. You need a Fireside horn. There is a definite mismatch between the Diamond B reproducer and the 14" witch hat horn. It'll sound a lot better too!
- LimeTree99
- Victor O
- Posts: 58
- Joined: Wed Dec 13, 2023 12:53 pm
Re: Fireside Restoration
Chuck,ChuckA wrote: Mon Jan 15, 2024 4:12 pm Your work looks very good, but I would make two recommendations when applying decals.
First is to use MicroSol or MicroSet to soften the backing film, it will help adhere the decal to your work and let it form over any rough places.
Second is to make the film edges disappear by applying multiple medium coats of shellac to the dry decal and lightly
sanding off the shellac covering the decal. Reapply more shellac and sand down again, keep doing that until the decal
blends into the work. I use 400 to 1000 grit paper until the final finish, if you don't like the gold look use amber shellac for the last couple of
layers and finally use plastic polish to polish out the fine sandpaper scratches.
Here is a Spring Motor I restored, took a few weeks of spraying and sanding, probably 15 coats and I left it gold colored instead of dulled.
SpringMotorDecals.jpg
A restored early Suitcase Home:
H902 closeup.jpg
Chuck
Thank you for the feedback!
When you spray on shellac, is the grainy "orange peel" texture right after the initial spraying part of the shellac build-up process, or was that an issue with the work surface? If it's unavoidable, I might feel more confident in the future about leaving it be, and letting a few coats build up before sanding everything. I'm assuming one would want a decent thickness to avoid accidentally sanding through the shellac and into the decals.
I'm used to brushing shellac onto wood, and lightly scuff-sanding any imperfections between each coat. I wasn't sure if building up multiple layers before sanding was the right way to go about it.
- ChuckA
- Victor III
- Posts: 602
- Joined: Thu Jan 15, 2009 6:32 pm
- Personal Text: Learn from the mistakes of others - You can't live long enough to make them all yourself.
- Location: South Eastern PA
- Contact:
Re: Fireside Restoration
Occasionally I did get some orange peel effect, all depended on how heavy the shellac is laid down. But it wasn't a problem sanding it down. Make sure the work yourLimeTree99 wrote: Tue Jan 16, 2024 8:18 am Chuck,
Thank you for the feedback!
When you spray on shellac, is the grainy "orange peel" texture right after the initial spraying part of the shellac build-up process, or was that an issue with the work surface? If it's unavoidable, I might feel more confident in the future about leaving it be, and letting a few coats build up before sanding everything. I'm assuming one would want a decent thickness to avoid accidentally sanding through the shellac and into the decals.
I'm used to brushing shellac onto wood, and lightly scuff-sanding any imperfections between each coat. I wasn't sure if building up multiple layers before sanding was the right way to go about it.
spraying is warm. The first couple of coats I did with what is called a "piss coat" more alcohol than shellac. Then heavier coats with less alcohol until I felt comfortable sanding off
the decals. I used one of those aerosol can units with a screw on bottle to make up the shellac.
Yes you do have to build up a few coats before you to the first sanding or even with 1000 grit paper you will cut into the decal.
Hope this helps. Gregg could give you some good ideas, I've seen his work and it's virtually perfect.
Chuck
- Homestead
- Victor O
- Posts: 92
- Joined: Thu Dec 14, 2023 12:10 am
- Personal Text: Deep in the East Texas Phonograph Desert
- Location: East Texas
- Contact:
Re: Fireside Restoration
Those restorations look wonderful....machines look factory fresh.....As time goes on pristine machines will be harder and harder to find. I'm so glad Greg Cline makes such wonderful decals. Year ago the ones I got from Karl Frick were just awful in retrospect, but hey thats all we had back then!!! James Manker
- Zwebie
- Victor IV
- Posts: 1466
- Joined: Thu Feb 23, 2012 2:55 pm
- Personal Text: We are only the caretakers for future generations.
- Location: FLORIDA
Re: Fireside Restoration
Exceptional work!
Looks Great!
Bob S.
Looks Great!
Bob S.